
Looking for a way to keep track of your inventory in WooCommerce? Barcodes are an efficient way to find out what you have in stock and what you don’t. However, to generate barcodes in WooCommerce, you’ll need a third-party plugin. We explain how you can go about it in this brief guide to WooCommerce barcode inventory management.
What are barcodes and why should you use them?
Barcodes are machine-readable codes that contain information about a product, such as price, weight, manufacturer’s name, expiration date, and other data. Each barcode is unique to the product it is appended to. When you scan a product barcode label or QR code using a POS barcode scanner, it brings up product information, and upon a sale, inventory can be updated in real-time.
Barcodes are ubiquitous in manufacturing and logistics sectors that use them to track the movement of products through the supply chain. Barcode scanning is a common sight at physical stores, but even eCommerce store owners that operate entirely online or also run a physical store can benefit from implementing barcodes.
Why use barcodes for your business?
QR code usage among U.S. shoppers has soared, especially with younger shoppers, with 16 million more U.S. consumers expected to be scanning QR codes by 2025. They’re suitable when large amounts of data need to be stored and made available to shoppers, although “large” in this context is 3kb.
Barcodes are preferable to QR codes when you need to store an item identification number or extract information about a product from a database. They make inventory management more accurate and efficient compared to either QR codes or manual inventory methods.
Barcodes are relatively inexpensive, reduce manual labor costs and help speed up the supply chain. For online WooCommerce store owners, generating and scanning barcodes is an easy way to keep track of their products and order statuses.

If you also have a physical store, barcodes go on your product and are scanned at your POS for faster checkouts. Utilizing barcodes efficiently alone can result in a vastly faster point-of-sale experience. Budget supermarket Aldi, for example, places multiple barcodes on each product, some of which are oversized, meaning cashiers don’t need to spend time finding the barcode. Aldi checkouts are 40% faster than their competitors.
Whether you have an incredibly high-volume supermarket or a store with a couple of items, adding customizable barcodes to your products is an obvious addition to WooCoommerce. A WooCommerce POS barcode scanner can be useful for physical products, but also for bookings, tickets, and reservations.
However, WooCommerce doesn’t have built-in functionality for inventory management with barcodes. This leaves you with two options: manual tracking or a third-party solution that lets you create a WooCommerce barcode inventory system. Given a choice between the two, creating and scanning barcodes is always better – here’s why.
Why use a WooCommerce POS solution to scan barcodes?
Many products already have barcodes appended to them. If you just need to scan barcodes rather than create your own, you can use a WooCommerce POS plugin. If you need to generate barcodes, you’ll need a solution built for this functionality.
A WooCommerce POS barcode scanner will help you with two critical business activities:
Sending items to the POS system for quick checkouts
When a customer makes a purchase, manually inputting product information like price, quantity and item code is time-consuming and inefficient. In contrast, a WooCommerce POS solution with barcode scanning identifies the product via its barcode and relays the product information to the POS system for your cashier to take payment. This makes checkouts faster and less labor-intensive. It also makes payments more streamlined, helping maintain the pace of day-to-day sales.
Managing inventory in real-time
The average US retail operation has an inventory accuracy of only 63%. A POS barcode scanner helps increase inventory management accuracy. As updates to stock levels happen in real-time, you always have the true picture of your inventory at any time. You can replenish stock, hold off on ordering items that have remained unsold, or prioritize the purchase of fast-selling products in an informed and proactive manner.
Many WooCommerce POS scanners allow you to use barcodes to take stock of your inventory and ensure that the inventory of your online store reflects sales made in person. When a customer buys a product, you can scan its barcode and take it out of your inventory records immediately. With real-time inventory data at your fingertips, you can make business decisions swiftly throughout the day. Additionally, a WooCommerce POS barcode scanner is a useful time-saving solution for stock management, eliminating hours of admin work and creating a simple workflow for staff to track inventory.
A WooCommerce barcode inventory system is more efficient and accurate
Barcodes provide a detailed view of the current inventory, saving hours on physical inventory counts. Apart from products, barcodes can also be assigned to locations, such as a shelf in your stockroom or warehouse. Staff can scan both product and location barcodes to manage inventory at multiple locations quickly and easily.
Each barcode is assigned to a specific SKU in your store. When that item is sold, the product stock levels will update automatically. This is especially useful if you run a physical store alongside your online eCommerce store because it means you can keep all your products within WooCommerce while selling between different outlets.
The best way to use barcodes to keep track of inventory is with a WooCommerce Point of Sale (POS) solution that allows you to scan barcodes on the fly and automatically update stock levels. You can be assured of reliable views of items currently in stock and maintain stock levels according to your requirement and market demands.
Using a Point of Sale Solution for WooCommerce Barcode Inventory Management
When you decide to implement barcode-based WooCommerce inventory management using a POS plugin, choose Jovvie. The WooCommerce Point of Sale plugin has all the features needed for physical stores including integration with a mobile scanner app, payment processing, and automatic inventory management.
★★★★★ RATED 4.9/5 BY 5,000+ WOOCOMMERCE STORES
Sell anywhere. Sync to WooCommerce instantly.
Your retail counter, your tradeshow booth, your next pop-up — Jovvie is the only POS built natively for WooCommerce. No duplicate inventory, no failed syncs, no middleware.
The WooCommerce inventory management plugin is used by tens of thousands of WooCommerce store owners that need a native POS solution for WooCommerce. Here are some reasons to use Jovvie for WooCommerce barcode inventory management:
- Allows you to scan barcodes and update inventory levels automatically using a mobile device or tablet, whenever or wherever a sale is made. With no need for clunky POS hardware, you can sell both in-store and on the go seamlessly.
- Automatically tracks purchases across online and offline storefronts and updates your WooCommerce inventory levels accordingly – even with product variations.
- Jovvie is easy to set up and sits right in your WordPress dashboard. All WooCommerce settings, products, and customers are automatically and continuously synchronized to the POS, which cuts down implementation time. On top of this, detailed reports of everything you need to effectively run your business, from product sales to customer insights, are available from your WooCommerce dashboard.
- Set up one or many different cashier stations with customized settings depending on the requirements of your store. Want to offer a guest checkout option? Jovvie’s kiosk mode makes this easy, and you can even pair with sister plugin, BizPrint, to auto-print receipts at checkout.
- The full WooCommerce POS solution supports all major payment gateways, including Stripe and Stripe terminal for swipe, tap, or scan payments, so you can offer more payment methods to your customers.
Choosing between self-hosted and Cloud Jovvie
Choose Jovvie Cloud to get done-for-you POS hosting. Cloud deployment allows for the same convenience as any other plugin but does the heavy-lifting while bringing all the performance benefits and taking care of real-time synchronization and automatic updates. This is available on a monthly basis.
Jovvie Cloud is the best choice for most users: it’s about 50% faster than self-hosted Jovvie on typical WooCommerce hosting, with a 99.5% uptime guarantee, ensuring you don’t keep customers waiting.
Choose self-hosted Jovvie to run your POS on your own WooCommerce hosting, the same as you would any other WooCommerce plugin. Self-hosted is available at $39/month. This plan includes all features and you can accept card payments through Stripe Terminal, with no increase to your transaction fees. Self-hosted Jovvie allows you complete control over security and compliance, software updates, and performance.
How to Manage WooCommerce Inventory using Barcodes (step-by-step)
Once you’ve purchased your Jovvie POS license, there are just a few simple steps to start updating your stock with barcodes and setting up a WooCommerce barcode inventory system:
1. Make sure your products have barcodes
Many retail products already have barcodes on them, in which case you just need to connect those barcodes to your WooCommerce backend. You can also generate barcodes and store them in WooCommerce. Use a simple WordPress plugin such as the A4 Barcode Generator to generate barcodes for your WooCommerce products.
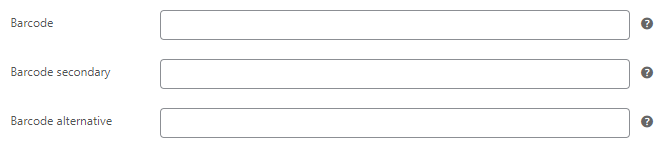
Jovvie supports the ability to store the barcode on the product view. It accepts up to three barcode types for products and variable products To view the barcode fields, go to Products > Edit Product > Inventory. You can add a UPC, EAN, or another type of barcode here.
2. Download and install the necessary plugins
You’ll need the Point of Sale WP API connector plugin and the Point of Sale WP UI self-hosted plugin, available direct from Jovvie. The steps are simple to follow even for non-technical users.
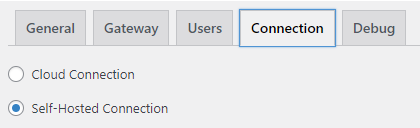
3. Enable cloud or self-hosting
Once the plugins have been installed, select POS Settings > Connections. Choose your preferred service.
4. Access a POS station
Click POS > Stations, and select the station you want to use.

5. Set up your point of sale device
Connect your iPhone, iPad, or Android device to Jovvie using the BizSwoop app or web dashboard. This will allow you to scan barcodes directly from your mobile device.
6. Scan barcodes
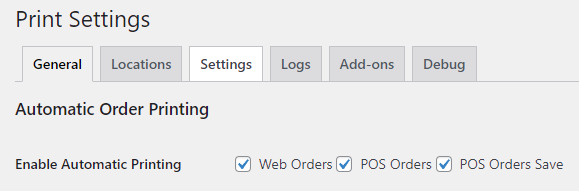
Jovvie integrates with sister product BizPrint, a product for auto-printing receipts, packing slips, invoices, shipping labels, and other documents from WooCommerce.
You can set up BizPrint in a few simple steps, and create a custom template in it that includes barcodes. Then, connect the barcodes generated using the A4 Barcode Generator to the label template using WordPress hooks and filters. You can print the labels automatically and append them to your products.
Anytime a customer wants to purchase a product in your physical store, simply scan the product barcode to send the product to the POS system. Once the sale is completed, the inventory level will automatically be updated in WooCommerce!

Create a WooCommerce barcode inventory system with Jovvie
Barcodes are a must-have solution for fast, error-free item identification and inventory tracking. They help prevent stockouts or overstocks and boost customer satisfaction. You can implement WooCommerce barcode inventory management with Jovvie via cloud or self-hosting. Jovvie is easy to set up, automatically updates products and customers, and provides an accurate picture of your inventory at any given time.
★★★★★ RATED 4.9/5 BY 5,000+ WOOCOMMERCE STORES
Sell anywhere. Sync to WooCommerce instantly.
Your retail counter, your tradeshow booth, your next pop-up — Jovvie is the only POS built natively for WooCommerce. No duplicate inventory, no failed syncs, no middleware.