

Whether you need to accept payments online, in person, or both, Stripe gives WooCommerce store owners a single payment platform for every sales channel.
You can then use it to process in-person transactions using Stripe Terminal. While Stripe Terminal is extremely useful for vendors who run both online and offline stores, it doesn’t offer native functionality with WooCommerce stores – especially those stores using a point of sale (POS) system.
In this article, we explain how to integrate Stripe with WooCommerce for online payments and how to pair Stripe Terminal with WooCommerce. We also show you how to accept in-person payments with Stripe Terminal through Jovvie, a WooCommerce POS that allows you to sell online, in a physical store, or on the go.
Prerequisites for using Stripe with WooCommerce
Before setting up Stripe for online or in-person payments, confirm your site meets these requirements:
- An active SSL certificate on your WordPress site. Stripe requires HTTPS for all transactions.
- A Stripe account. You can create one for free at stripe.com.
- WooCommerce installed and activated on your WordPress site.
- A business based in a Stripe-supported country.
- WordPress 5.x or higher and PHP 7.4 or higher.
How to set up Stripe for online payments in WooCommerce
The WooCommerce Stripe Payment Gateway plugin is the standard method for accepting online Stripe payments in WooCommerce. It connects your store to Stripe’s payment processing infrastructure for credit cards, debit cards, and digital wallets.
- To install the plugin, navigate to Plugins → Add New in your WordPress dashboard, search for “WooCommerce Stripe Payment Gateway”, click Install Now, then Activate.
- To connect your Stripe account, go to WooCommerce → Settings → Payments → Stripe and click the “Connect with Stripe” button. Follow the prompts to authorise your account.
- Configure webhooks so Stripe can communicate payment updates back to your store. The endpoint format is yoursite.com/?wc-api=wc_stripe.
- In the Stripe settings panel, you can also enable express checkout options including Apple Pay and Google Pay, and activate additional payment methods such as iDEAL, Bancontact, or SEPA Direct Debit.
- To test the integration before going live, use Stripe’s test card number 4242 4242 4242 4242 with any future expiry date and any three-digit CVC.
For the full setup walkthrough, see WooCommerce’s official Stripe documentation.
What is Stripe Terminal?
Stripe Terminal is an in-person payments platform that lets businesses accept physical card and contactless payments using pre-certified card readers. It supports credit cards (Visa and Mastercard), debit cards, and contactless methods including Google Pay, Apple Pay, and Samsung Pay.
By using Stripe Terminal for WooCommerce, stores already using Stripe as their online payment gateway can extend the same payment gateway to their physical store. This capability is useful for retailers and eCommerce stores requiring a dedicated in-person payment solution that syncs with their sales channels, but who lack the resources or expertise to develop it.
Why should you use Stripe Terminal for your WooCommerce store?
Using Stripe Terminal for WooCommerce has a number of benefits for store owners:
- A unified system for online and in-person sales: Stripe Terminal allows you to accept debit card, credit card, and contactless payments through a WooCommerce Point of Sale system. This allows you to take card payments at your physical store while keeping your inventory and revenue synced with WooCommerce.
- Simplifies omnichannel payment reconciliation: Using your existing Stripe account to also accept in-person payment makes reporting simple because you don’t have to reconcile two different sales channels.
- Secure in-store payments:Stripe Terminal for WooCommerce offers EMV, swipe, and contactless payments. It works only with pre-certified readers that ensure end-to-end encryption.
- Custom in-store checkout experiences: When you use Stripe Terminal for WooCommerce in-store payments, you can save card details or attach payment details to the customer’s online account, display individual items on the smart reader screen, and create custom receipts.
- No-hardware option. Stripe also offers Tap to Pay on iPhone and Android, which lets you accept contactless payments using a compatible mobile device without a separate card reader.
The platform is available in:
- Australia
- Canada
- United States
- Ireland
- United Kingdom
- Portugal
- France
- Luxembourg
- Germany
- Netherlands
- Italy
- Czech Republic
- Finland
- Singapore
How much does Stripe Terminal cost?

Stripe takes 2.7% + $0.05 of each physical card transaction. For comparison, Stripe’s standard online transaction fee is 2.9% + $0.30, making in-person rates lower per transaction.
Stripe Terminal supports several card readers. The price and availability of these vary depending on your location:
- Stripe Reader M2: a portable Bluetooth reader designed for mobile and pop-up sales. Available in the US. Retails for $59. Compatible with Jovvie.
- BBPOS WisePad 3: a portable Bluetooth reader available in all Stripe Terminal countries outside the US. Retails for $59. Compatible with Jovvie.
- Stripe Reader S700: an advanced smart reader with a touchscreen and support for custom UI.
Jovvie is fully compatible with all of these options. They connect via Bluetooth, making them suitable for in-store, pop-up, and on-the-go sales. You don’t need any additional hardware beyond the card reader and an iPhone XS or Android device to run the Jovvie POS interface.
For stores that do not need a physical reader, Stripe also offers Tap to Pay on iPhone and Android, which accepts contactless payments directly on a compatible mobile device.
How to connect Stripe Terminal to WooCommerce
Stripe Terminal does not connect to WooCommerce natively. You need a plugin or POS solution to bridge the two platforms.
1. First, you need to be using Stripe Payment Gateway on your site. If you’re not using it already, you can download the official Stripe WordPress plugin and install and activate it in your WordPress admin dashboard.
2. Once you’ve set up Stripe Payment Gateway, download and activate the Terminal for Stripe and WooCommerce plugin, a third-party bridge plugin that connects Stripe Terminal to WooCommerce.
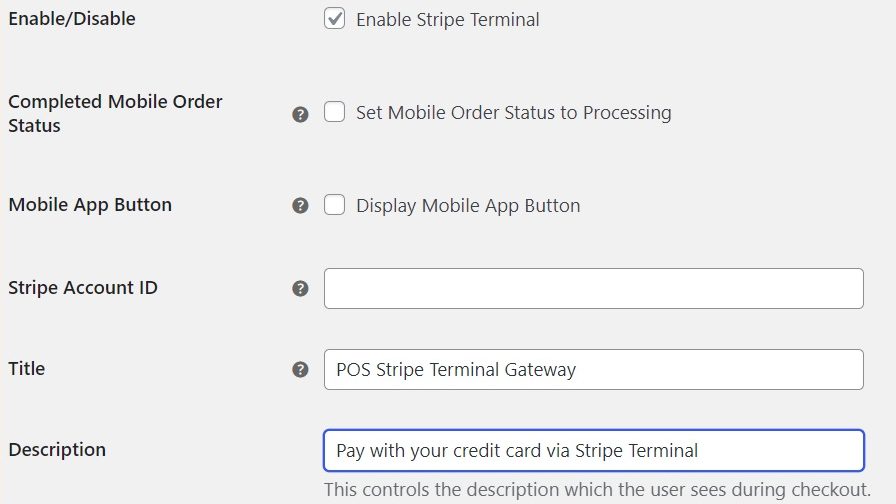
3. Look for ‘Terminal for Stripe and WooCommerce’ on the left-hand side of the WordPress admin dashboard and click ‘Settings’.
4. Check ‘Enable Stripe Terminal’ and enter your Stripe Account ID.
5. Give a name and description to your payment method, which customers will see at checkout.
An alternative way to connect Stripe Terminal to WooCommerce is by using the WooCommerce M2 Card Reader, which is WooCommerce’s own solution for in-person payments. However, this solution is only available in the US, and it requires you to use the WooCommerce Mobile App and the Jetpack plugin. It is only recommended if you need to take physical payments from time to time!
How to accept in-person payments with Stripe Terminal and a WooCommerce Point of Sale system
Stripe Terminal allows you to integrate Stripe payments into your native web-based or mobile POS application. However, integration requires programming experience with Javascript, Android, iOS, or server-driven UI. Instead, we recommend that you use a no-code POS solution that works with Stripe Terminal, like Jovvie.
One of the great benefits of a WooCommerce POS like Jovvie is that it allows you to send in-person payments directly to WooCommerce. Jovvie is an official Stripe Partner, and using the solution in conjunction with Stripe Terminal will help you to take physical payments seamlessly and sync them across your WooCommerce store.
★★★★★ RATED 4.9/5 BY 5,000+ WOOCOMMERCE STORES
Sell anywhere. Sync to WooCommerce instantly.
Your retail counter, your tradeshow booth, your next pop-up — Jovvie is the only POS built natively for WooCommerce. No duplicate inventory, no failed syncs, no middleware.
Here’s how you can go about connecting Stripe Terminal with Jovvie:
1. Choose a self-hosted or cloud plan for Jovvie and follow the Quick Start Guide relevant to your hosting setup.
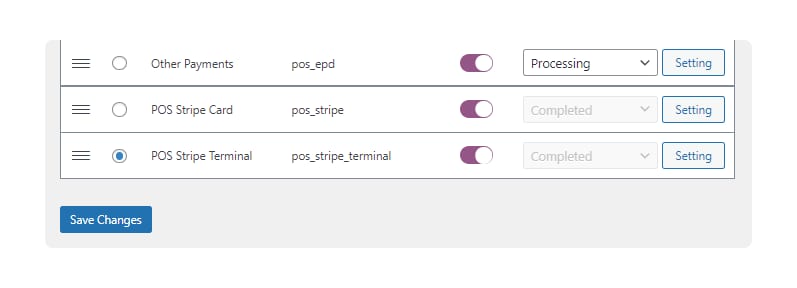
2. After setup is complete, go to POS > Settings > Gateways in the WordPress admin dashboard.
3. Enable ‘POS Stripe Terminal’ as a payment gateway.
4. Open the BizSwoop app, go to settings and enter the App Server Settings:
- The Default POS Station should be as follows: yoururl.com/pos
- Custom stations should use the ID of the station, for example: yoururl.com/pos/[id]
- The API Server URL should be: yoururl.com
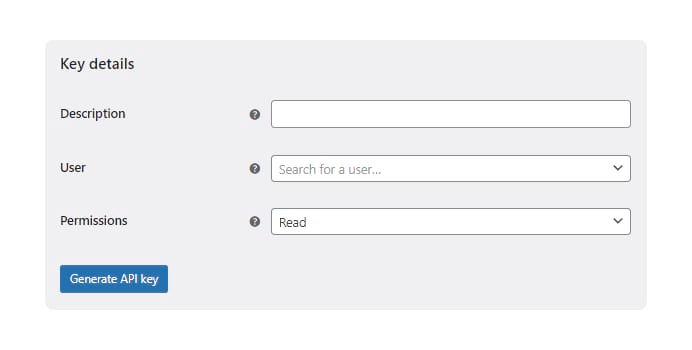
5. Next, navigate to WooCommerce > Settings > Advanced > REST API. Add Key. Generate a key as per the following settings:
- Description: Stripe Terminal
- Permissions: Read/Write
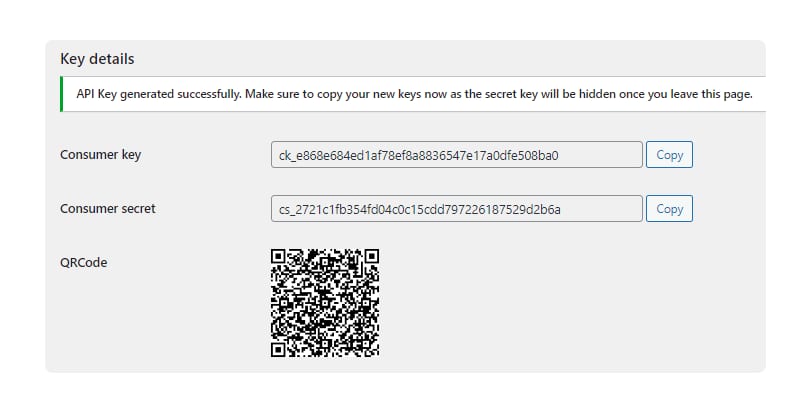
6. Copy and paste the API Consumer Key and API Consumer Secret into the BizSwoop app.
7. Enable the Credit Card Gateway on the BizSwoop app, set the provider as Stripe Terminal, and set the Stripe Terminal Device as the connection type.
8. Finally, add a location ID, which is generated in your Stripe Dashboard when you create a new address location. Copy and paste the location ID back into the BizSwoop app.
That’s it! POS Stripe Terminal will now show as an option in your POS interface!
Once a payment is processed through Stripe Terminal, the transaction automatically syncs with your WooCommerce orders and inventory. No manual reconciliation is needed.
Troubleshooting common Stripe Terminal and WooCommerce issues
Here are some of the most common set up issues you might encounter along the way and how to solve them:
- Card reader not connecting. Ensure the reader and your device are on the same network. For Bluetooth readers, confirm Bluetooth is enabled and the devices are paired. If the reader still does not connect, re-register it using the registration code displayed on the device screen.
- Stripe not appearing in WooCommerce payment settings. Check that the WooCommerce Stripe Payment Gateway plugin is installed and activated. Navigate to WooCommerce → Settings → Payments to confirm Stripe is listed and enabled.
- Webhook errors. Verify that the webhook endpoint URL matches your site. In the Stripe Dashboard, go to Developers → Webhooks and check for failed delivery attempts.
- Test mode transactions not appearing. Confirm that test mode is enabled in both your WooCommerce Stripe settings and your Stripe Dashboard. Ensure you are using the correct test API keys, not live keys.
- SSL certificate errors. Stripe requires HTTPS for all connections. Verify your SSL certificate is active and has not expired.
For further help, see WooCommerce’s Stripe troubleshooting documentation.
For Stripe Terminal issues specific to Jovvie, contact the Jovvie support team.
Get Stripe Terminal for WooCommerce and start accepting in-store payments
Stripe gives WooCommerce store owners a single payment platform for online and in-person sales. With the WooCommerce Stripe Payment Gateway plugin handling online transactions and Stripe Terminal powering physical card payments, you can manage both channels through one Stripe account – keeping orders, inventory, and reporting in sync.
Integrating Stripe Terminal with WooCommerce normally requires developer resources, but Jovvie removes that barrier.
As an official Stripe Partner, Jovvie connects Stripe Terminal to your WooCommerce store without code, supports various readers and charges no additional processing fees on top of Stripe’s rate.
Get started with Jovvie and see how easy it is to start accepting card and cashless payments at your store.
★★★★★ RATED 4.9/5 BY 5,000+ WOOCOMMERCE STORES
Sell anywhere. Sync to WooCommerce instantly.
Your retail counter, your tradeshow booth, your next pop-up — Jovvie is the only POS built natively for WooCommerce. No duplicate inventory, no failed syncs, no middleware.
FAQs
What’s the difference between WooPayments and the Stripe plugin for in-person payments?
WooPayments is WooCommerce’s own payment solution, built on Stripe’s infrastructure. It includes in-person payment support through the WooCommerce mobile app, but this feature is currently limited to the US and UK. The standard Stripe plugin (WooCommerce Stripe Payment Gateway) handles online payments and requires a separate terminal plugin or POS solution like Jovvie for in-person transactions. WooPayments is simpler to configure but offers less flexibility. The Stripe plugin combined with Jovvie provides more control, supports more card reader hardware, and works in more countries.
How does Stripe Terminal compare to Square for WooCommerce?
Stripe Terminal integrates directly with WooCommerce through plugins like Jovvie, keeping all orders and inventory within a single system. Square requires a separate Square account and does not natively sync transactions with WooCommerce. Stripe Terminal fees for in-person payments are 2.7% + $0.05 per transaction. For WooCommerce-native stores, Stripe Terminal offers tighter integration because payments, orders, and inventory remain in one platform.