

Offering a seamless payment experience is crucial for the success of eCommerce businesses. Stripe, a globally renowned payment platform, stands out by enabling store owners to accept payments online, in-store, or on the go. This versatility is enhanced through its integration with WooCommerce, a popular eCommerce solution for WordPress websites.
The synergy between Stripe and WooCommerce offers numerous advantages, including the ability to conduct secure transactions and support a variety of payment options like credit/debit cards and express checkout options like Google Pay and Apple Pay. Additionally, this integration boasts ease of setup with no initial costs or monthly fees.
In this article, we guide you through the steps to efficiently set up Stripe checkout in your WooCommerce store, covering everything from installation and configuration to testing the integration.
Additionally, for those looking to accept in-person payments, we introduce a recommended WooCommerce Point-Of-Sale (POS) solution that works seamlessly with Stripe, such as Jovvie. This will ensure your eCommerce platform is fully equipped to meet the demands of today’s shoppers.
★★★★★ RATED 4.9/5 BY 5,000+ WOOCOMMERCE STORES
Sell anywhere. Sync to WooCommerce instantly.
Your retail counter, your tradeshow booth, your next pop-up — Jovvie is the only POS built natively for WooCommerce. No duplicate inventory, no failed syncs, no middleware.
Step-by-step guide to activate Stripe Checkout for WooCommerce
Activating Stripe Checkout for your WooCommerce store is a simple process that significantly enhances your online store’s customer experience. By offering better payment flexibility and heightened security, Stripe enables secure payments, as well as a smooth checkout process.
Follow along with the steps below and unlock a more versatile payment system designed to support the diverse needs of modern consumers.
Installing the WooCommerce Stripe Payment Gateway extension
Integrating Stripe into your WooCommerce store begins with the installation of the WooCommerce Stripe Payment Gateway extension. This plugin facilitates the use of Stripe for processing payments directly on your site, supporting a wide range of payment methods, including credit/debit cards and express checkout options like Apple Pay and Google Pay.

Here’s how to get started:
Installing the Stripe WooCommerce extension
- Navigate to Plugins > Add New in your WordPress dashboard.
- Search for “Stripe” and press Enter.
- Find “WooCommerce Stripe Payment Gateway” by WooCommerce among the top results.
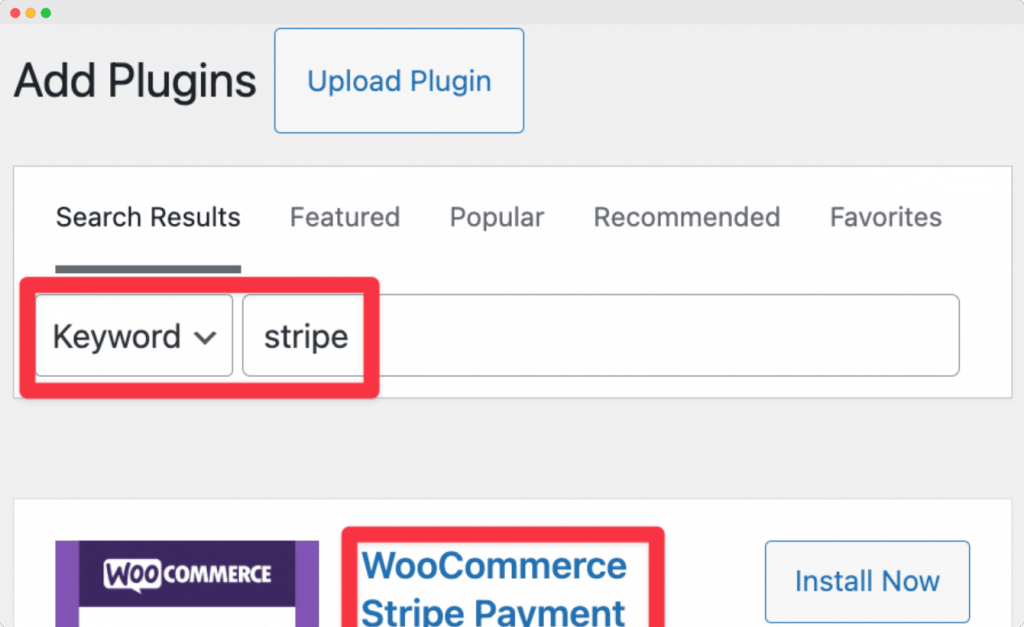
- Click Install Now to start the installation. After it finishes, this button will switch to Activate.
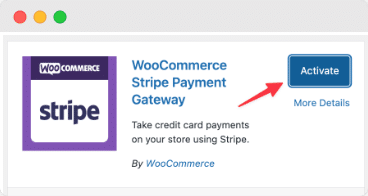
- Click Activate to complete the process. You’ll then be redirected to the Plugins > Installed Plugins page.
For detailed steps, refer to the WooCommerce documentation.
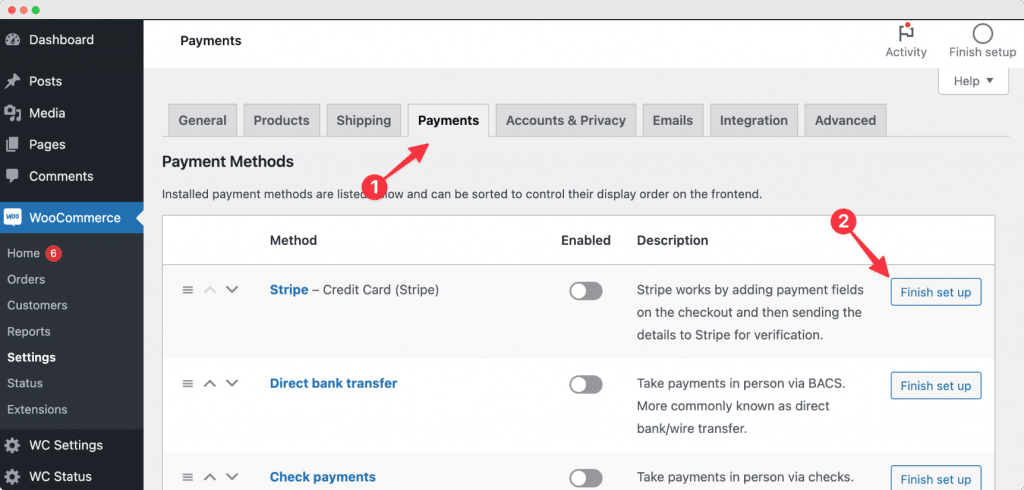
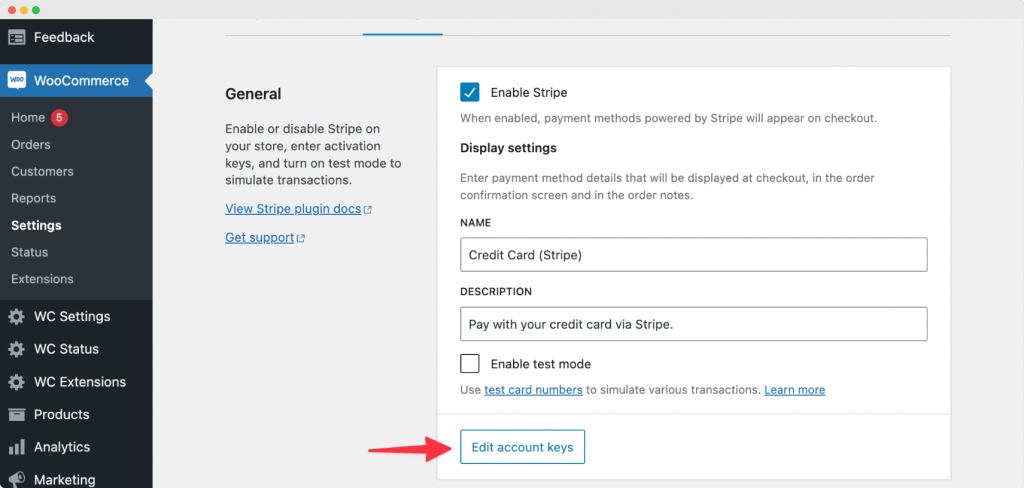
Creating/connecting a Stripe account
- Go to WooCommerce > Settings > Payments.
- Click “Finish set up” under the Stripe payment method.
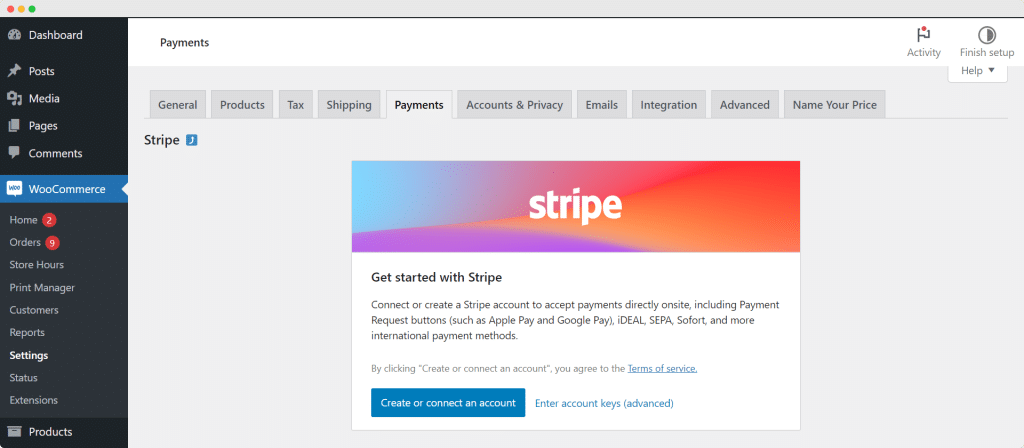
You’ll have two options for connecting your Stripe account:
- For a direct, secure connection, use the Create or connect an account button.
- To manually input your account details, choose the Enter account keys (advanced) link.
Detailed guidance is available from WooCommerce.
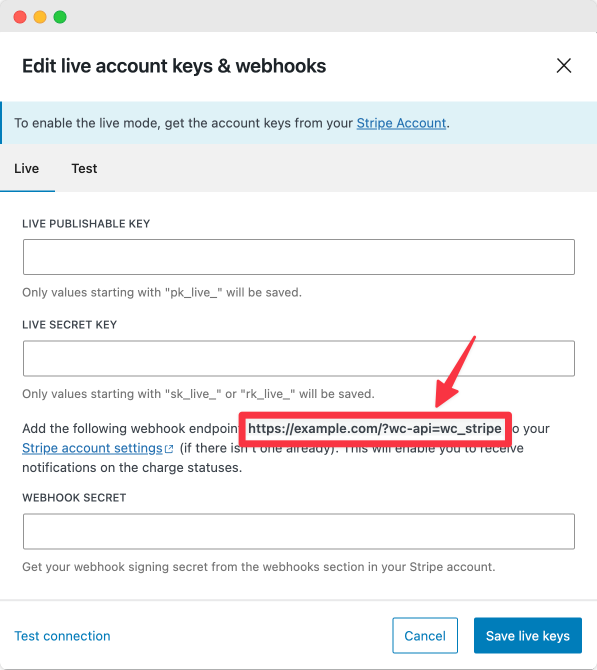
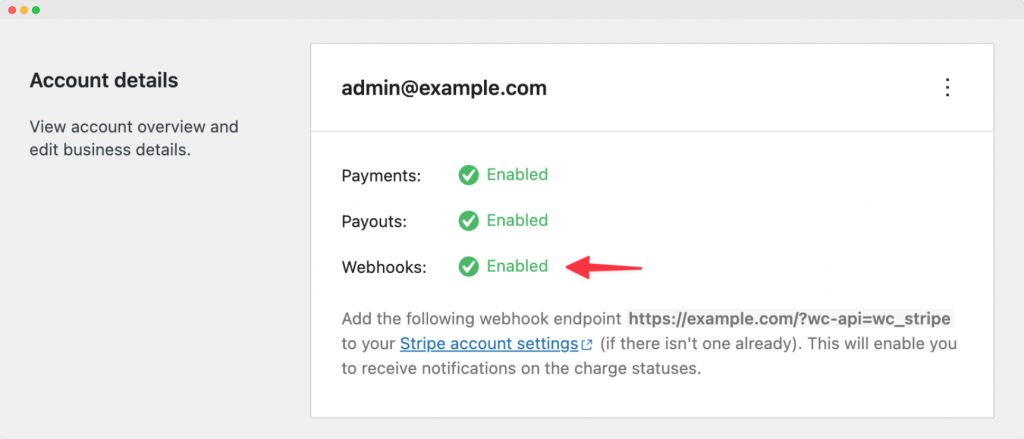
Setting up webhooks
After linking your Stripe account, it’s crucial to ensure it communicates effectively with the Stripe WooCommerce Extension on your site via “webhooks.” Webhooks are crucial for Stripe to communicate with your store, notifying it about events like successful payments. WooCommerce requires specific webhook configurations, which you can learn more about in the dedicated documentation.
To configure your webhooks:
- Find your webhook endpoint
- Go to WooCommerce > Settings > Payments > Stripe > Settings in your admin dashboard.
- Click on Edit account keys to open the Edit live account keys & webhooks popup, where you might have entered your Stripe API keys before.
- Copy the webhook endpoint (typically your site’s URL with ?wc-api=wc_stripe appended) to your clipboard.
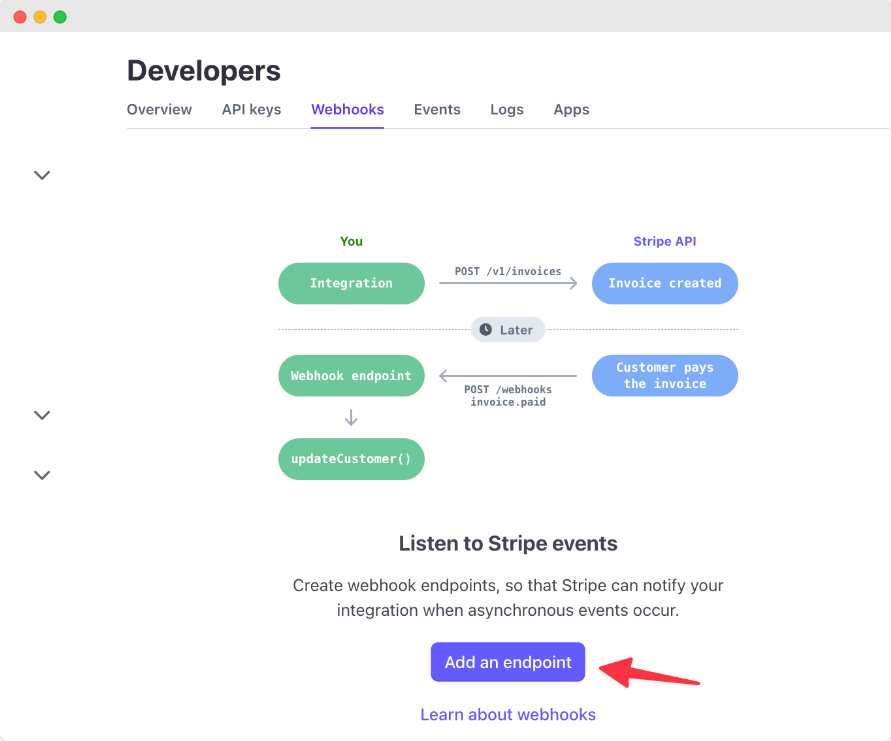
- Configure your webhooks in Stripe using this endpoint
- Add the new webhook endpoint to your Stripe account
- Select the events you wish to be notified about
- Add your webhook secret in the Stripe WooCommerce Extension settings.
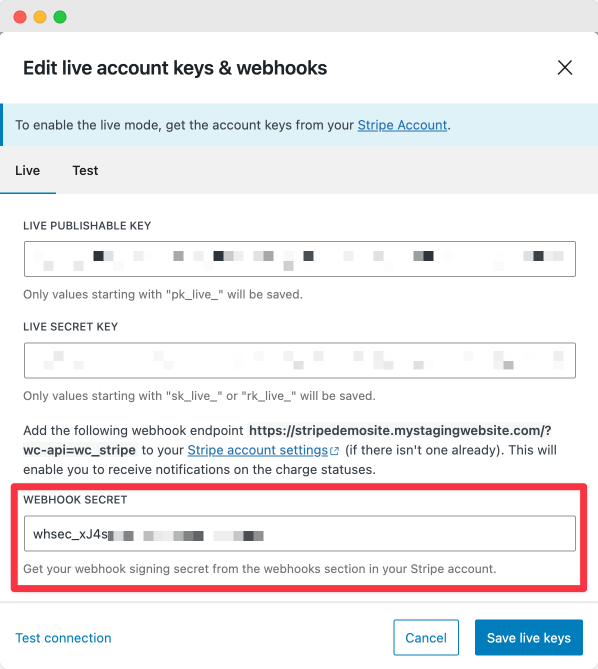
After setting up your webhooks, a green indicator will appear in the Account details section under WooCommerce > Settings > Payments > Stripe > Settings.
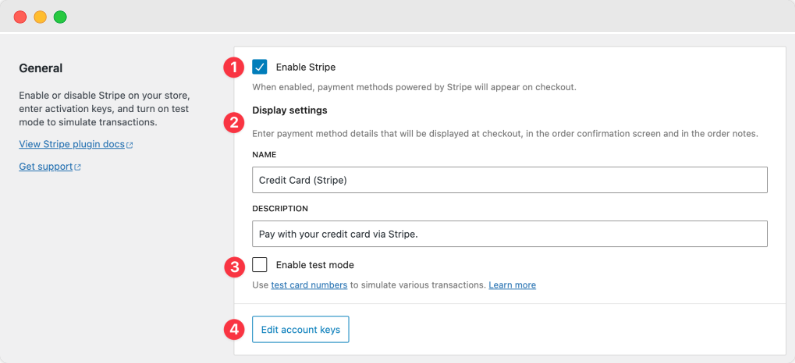
Configuring plugin settings
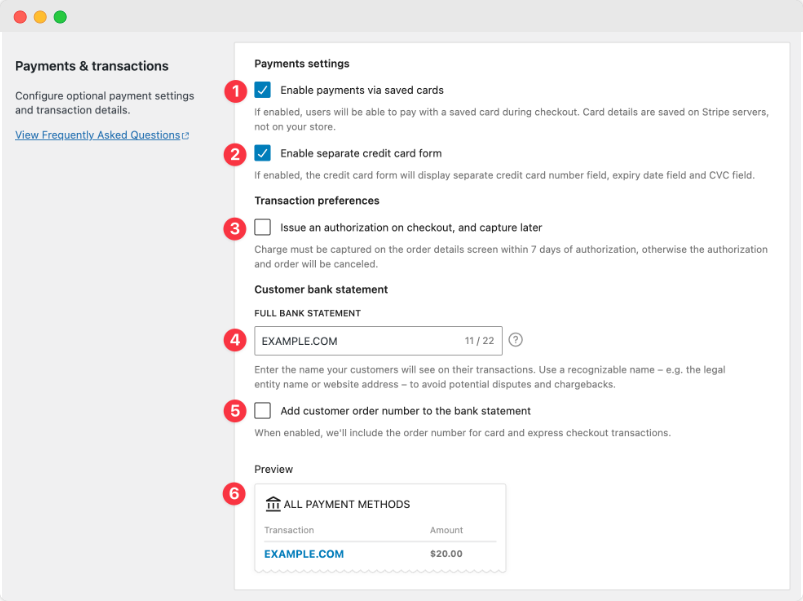
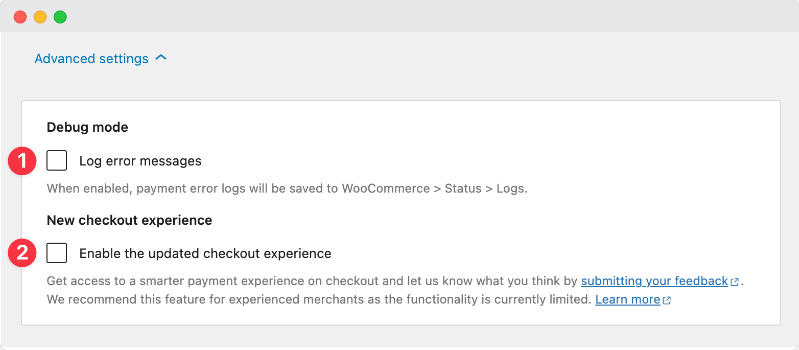
After setting up webhooks, configure the plugin settings according to your preferences at WooCommerce > Settings > Payments > Stripe > Settings. A comprehensive guide to these settings is available from WooCommerce and is broken down into four main sections:
- The General section determines the presentation of the Stripe payment option to customers.
- The Account details section provides an overview of your Stripe account’s capabilities and its integration with your site.

- The Payments & transactions section offers configuration options for payment settings and transaction details.
- By default, the Advanced settings section is hidden but can be accessed to activate debug logs and the new checkout experience.
For those interested in offering additional payment methods beyond the standard credit/debit cards and express checkouts, WooCommerce provides a guide on setting up additional payment methods. This allows you to further customize your checkout experience to meet the needs of your customer base. By following these steps, you’ll have Stripe fully integrated with your WooCommerce store, offering a secure and versatile payment system to your customers.
Testing your Stripe integration
Once you have installed and configured the WooCommerce Stripe Payment Gateway extension, it’s crucial to test the integration to ensure everything is working correctly. Testing helps you verify that payments are processed smoothly and ensures that your customers will have a seamless checkout experience.
Setting up the Stripe WooCommerce Extension for test mode and processing test payments requires the following:
- Addition of Test API Keys
- Addition of test webhook secret for your account
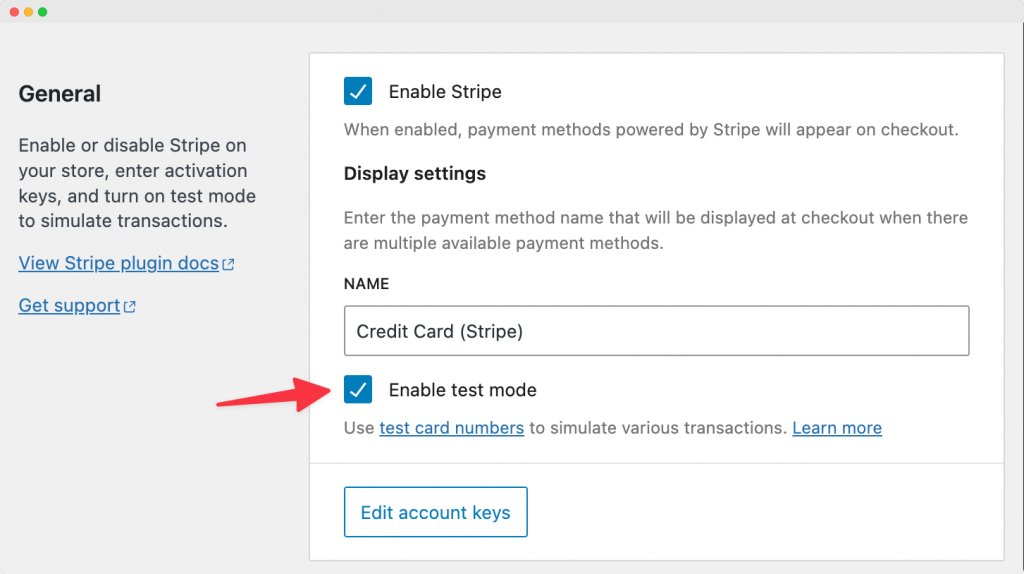
Enable test mode
Enabling test mode in the Stripe settings within your WooCommerce dashboard allows you to simulate transactions without processing real payments. After configuring your test API keys and webhook secret, enable test mode as follows:
- Go to WooCommerce > Settings > Payments > Stripe > Settings in your admin dashboard.
- Check the “Enable test mode” box in the General section.
- Click “Save Changes” at the bottom of the page.
Use test mode
After enabling test mode, you can conduct a test purchase. Stripe provides test credit card numbers for various scenarios (such as successful payments, declined payments, and different card brands). Use these numbers to conduct transactions and observe how your store handles each scenario.
You can also test the Stripe WooCommerce Extension’s express checkouts. For Google Pay, add a Stripe test card to your Google account. Apple Pay doesn’t allow adding test cards to your Apple ID, but the extension will use your saved Apple ID card credentials without actual charges.
For detailed instructions on how to perform these tests, including the specific test card numbers and scenarios, refer to the WooCommerce documentation on testing your Stripe integration.
If you encounter any issues during testing or after going live, the WooCommerce Stripe Extension troubleshooting page offers valuable insights and solutions to common problems, ensuring your payment gateway operates smoothly.
Accepting in-person payments via Stripe with Jovvie
For omnichannel WooCommerce store owners seeking to accept in-person payments, integrating Stripe offers a seamless solution to cater to both online and physical store transactions.
You have several options for accepting in-person payments via Stripe, each designed to fit different operational needs. One highly recommended approach is leveraging a POS solution like Jovvie, which offers straightforward and efficient integration with Stripe Terminal and WooCommerce.
Options for integrating Stripe Terminal with WooCommerce
- Using a third-party bridge plugin: This method involves pairing Stripe Terminal with WooCommerce to process in-person payments, requiring additional plugins for integration.
- WooCommerce M2 Card Reader: For a more direct integration, the WooCommerce M2 Card Reader can be connected with WooCommerce using the Woo mobile app and WooPayments extension, facilitating easy payment processing.
- Jovvie and Stripe Terminal integration: Jovvie provides a seamless connection between Stripe Terminal and WooCommerce, making it the preferred option for many businesses. This integration allows for a unified system that handles both your online and in-person sales efficiently.
Advantages of using Jovvie for in-person payments via Stripe
- Powerful inventory management: Jovvie offers robust inventory management features, ensuring synchronized inventory levels between your online store and physical sales points. This integration helps maintain accurate stock levels, reducing the risk of overselling or stockouts.
- Flexibility with unlimited locations, cashiers, and checkouts: Whether you operate a single store or multiple locations, Jovvie supports unlimited locations, cashiers, and checkout points, including innovative self-service options through kiosk mode.
- Enhanced customer management and analytics: Understanding your customers’ buying behaviors becomes simpler with Jovvie’s customer management and analytics features, enabling you to tailor your offerings and marketing strategies effectively.
- Transparent pricing: With Jovvie, the only additional costs are Stripe’s standard transaction fees, ensuring no hidden charges.
Integrating Stripe Terminal with Jovvie:
Integrating Stripe Terminal with Jovvie to accept in-person payments is straightforward. This process involves configuring your Stripe Terminal with Jovvie’s POS system, guaranteeing a smooth transaction process for your in-person sales.
Here’s how to link Stripe Terminal with Jovvie:
- Select a Jovvie self-hosted or cloud plan and follow the Quick Start Guide for your setup. Enjoy a 30-day free trial of any plan.
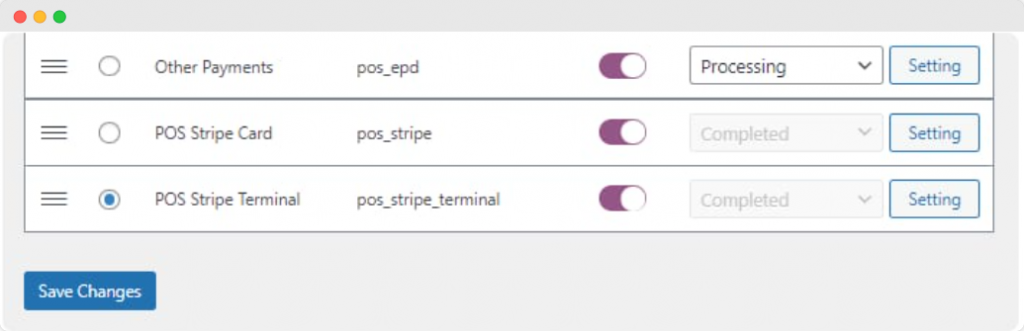
- Once set up, navigate to POS > Settings > Gateways in the WordPress admin area.
- Activate ‘POS Stripe Terminal’ as a payment method.
- In the BizSwoop app, enter the App Server Settings under settings.
- Go to WooCommerce > Settings > Advanced > REST API and create a new key.

- Input the API Consumer Key and Secret into the BizSwoop app.
- In the BizSwoop app, turn on the Credit Card Gateway, select Stripe Terminal as the provider, and choose Stripe Terminal Device for the connection.
- Add your location ID from the Stripe Dashboard, where it appears after creating a new address, into the BizSwoop app.
Now, the POS Stripe Terminal will be available as a payment option in your POS interface!
By choosing Jovvie for your in-person payment needs, you’re opting for a solution that simplifies transactions and also enhances your operational efficiency through comprehensive inventory and customer management. This integration ensures your business is well-equipped to offer a consistent and reliable shopping experience, regardless of how your customers choose to make their purchases.
For more detailed instructions on integrating Stripe Terminal with Jovvie, visit Jovvie’s Stripe Terminal integration guide.
Start accepting payments with Stripe Checkout in WooCommerce today
Integrating Stripe Checkout into your WooCommerce store opens a world of possibilities for your online business. This powerful setup ensures secure transactions, offering a wide array of payment options, and catering to the diverse preferences of your customers. The simplicity and ease of setup mean you can quickly enhance your store’s payment processing capabilities without any hassle.
Throughout this article, we’ve outlined the essential steps to get started with Stripe Checkout in WooCommerce, including installation, testing, and troubleshooting. Additionally, we’ve introduced an optimal solution for accepting in-person payments through the integration of Stripe with Jovvie.
This partnership simplifies payment processes and brings the extensive features of Jovvie into play. With Jovvie, you gain access to advanced inventory and customer management tools, the flexibility of unlimited locations and checkouts, and the assurance of no hidden costs, all while providing a seamless payment experience.
Take the first step to elevate your WooCommerce payment processing. Integrate Stripe, WooCommerce, and Jovvie, and position your business for greater efficiency, security, and versatility. Start now by exploring Jovvie’s pricing plans and unlock the full potential of your eCommerce store.
★★★★★ RATED 4.9/5 BY 5,000+ WOOCOMMERCE STORES
Sell anywhere. Sync to WooCommerce instantly.
Your retail counter, your tradeshow booth, your next pop-up — Jovvie is the only POS built natively for WooCommerce. No duplicate inventory, no failed syncs, no middleware.