
Ensuring seamless connectivity between payment processing platforms and online stores is crucial for maintaining efficiency and achieving customer satisfaction in eCommerce operations.
WooCommerce Stripe webhooks are an indispensable tool in this ecosystem, enabling real-time communication between Stripe’s payment platform and WooCommerce-powered online stores. These webhooks are pivotal for automating processes such as updating order statuses following successful payments or processing refunds, thereby significantly reducing manual effort and enhancing operational efficiency.
This comprehensive guide walks you through the steps to effectively set up and manage WooCommerce Stripe webhooks, ensuring your eCommerce operations are as streamlined and productive as possible. It will equip you with the knowledge to leverage webhooks for optimal payment processing and store management.
Steps to set up and configure WooCommerce Stripe Webhook integration
Setting up and configuring WooCommerce Stripe webhook integration is a pivotal step in ensuring your eCommerce platform runs smoothly, automating processes such as payment confirmations, order updates, and refunds. Before getting into the specifics, it’s important to note that this setup requires the WooCommerce Stripe Payment Gateway extension to be installed and configured on your site.
For comprehensive instructions on this initial setup, refer to our detailed guide on setting up Stripe Checkout for WooCommerce.
Step-by-step guide to configuring WooCommerce Stripe Webhooks:
To set up WooCommerce Stripe webhooks, you must install and activate the WooCommerce Stripe Payment Gateway extension. You can find this plugin in the WordPress plugin repository.

Once the WooCommerce Stripe Payment Gateway extension is installed and your Stripe account is created/linked, it’s crucial to ensure it communicates effectively with the extension on your site via “webhooks”. Webhooks are crucial for Stripe to communicate with your store, notifying it about events like successful payments. Here are the step-by-step instructions to configure webhooks, ensuring smooth integration between your Stripe account and WooCommerce site:
- Locate your site’s Webhook Endpoint:
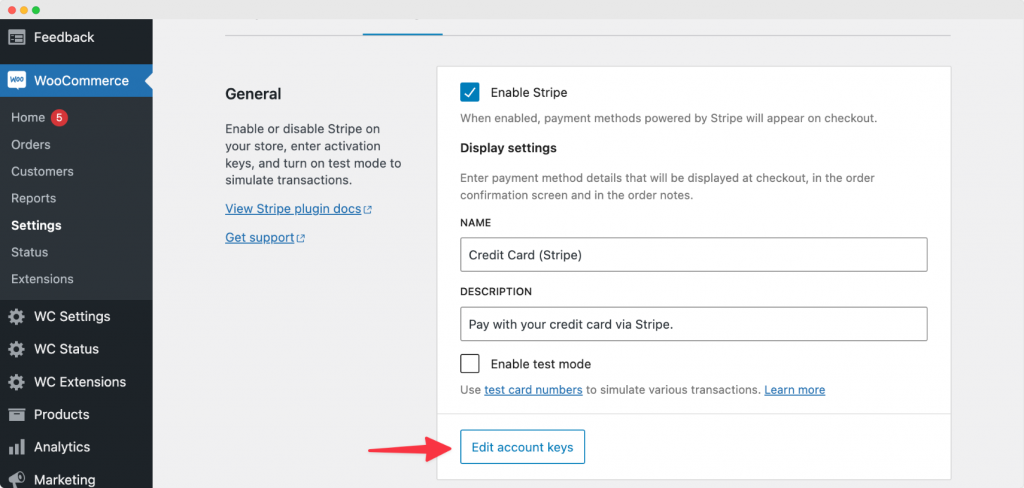
- Navigate to WooCommerce > Settings > Payments > Stripe > Settings in your WordPress dashboard.
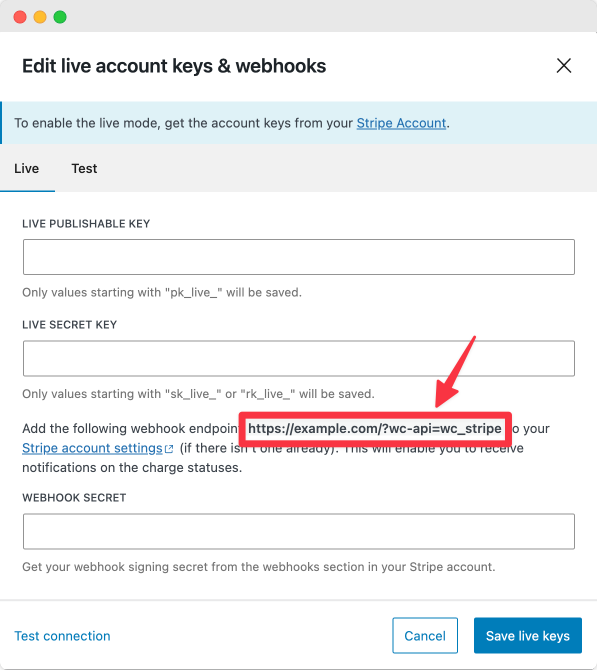
- Click on “Edit account keys”. This will open a popup displaying your webhook endpoint. Copy this URL.
- Add Webhook Endpoint to Stripe:
- Log in to your Stripe dashboard at https://dashboard.stripe.com/.
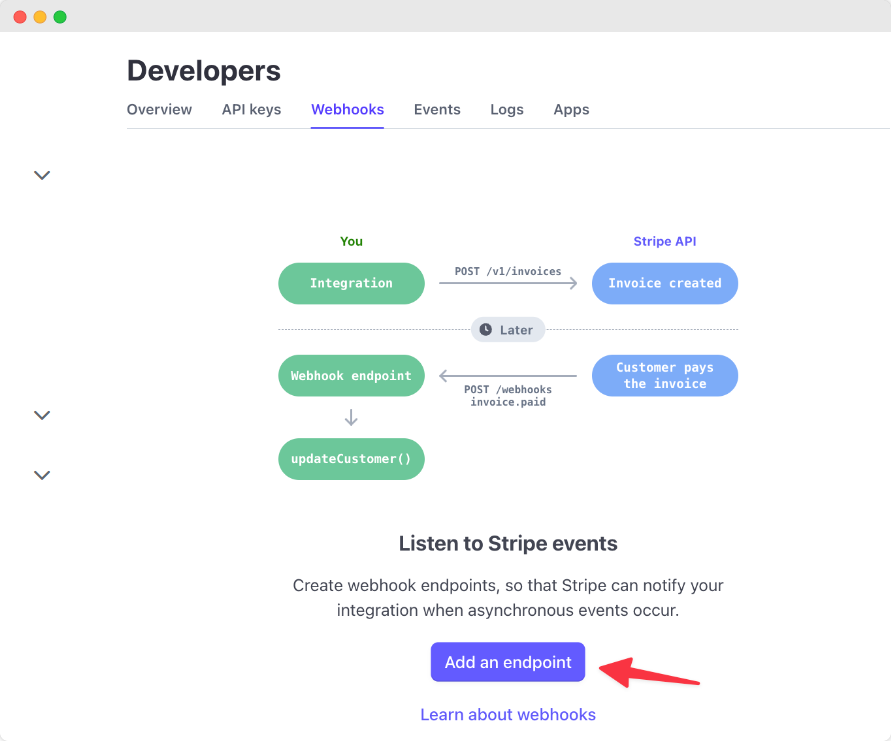
- Navigate to Developers at the top-right corner, then click the Webhooks tab.
- Next, click on “Add an endpoint” and paste the URL of the webhook endpoint copied earlier into the Endpoint URL field. You may also add a description for clarity.
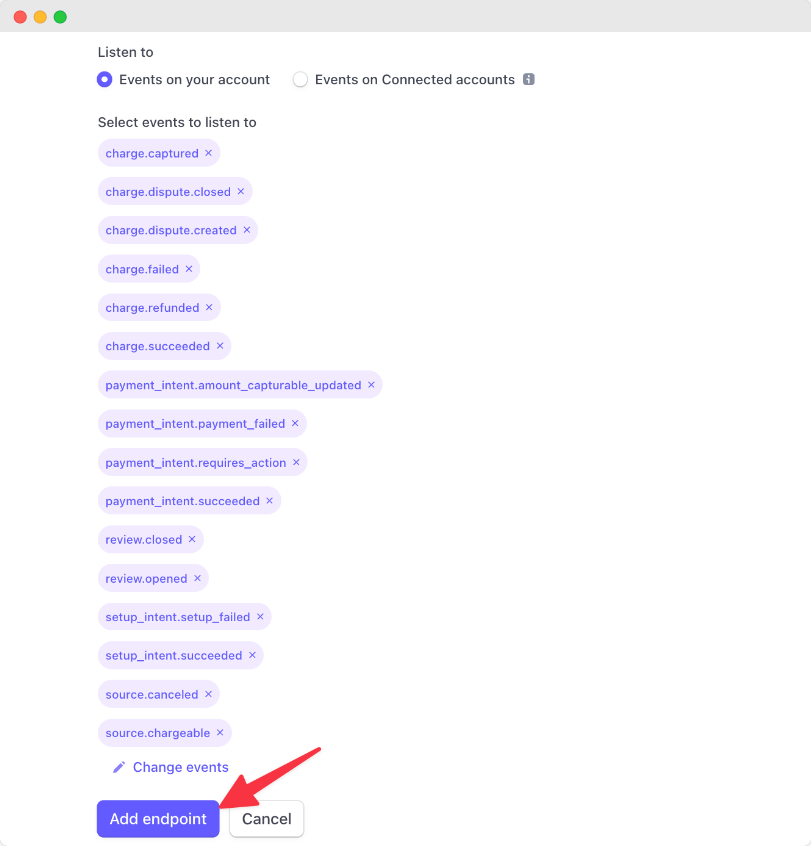
- Configure Event Listening:
- Configure the events Stripe should listen for by selecting Listen to > Events on your account. This will tell Stripe when a specific event occurs on your WooCommerce store so that it can trigger an action. Add the events relevant to your operations (a comprehensive list is available in the Stripe documentation).
- After selecting the events, click on Add endpoint. This step is crucial as it tells Stripe when to notify your WooCommerce store about specific events.
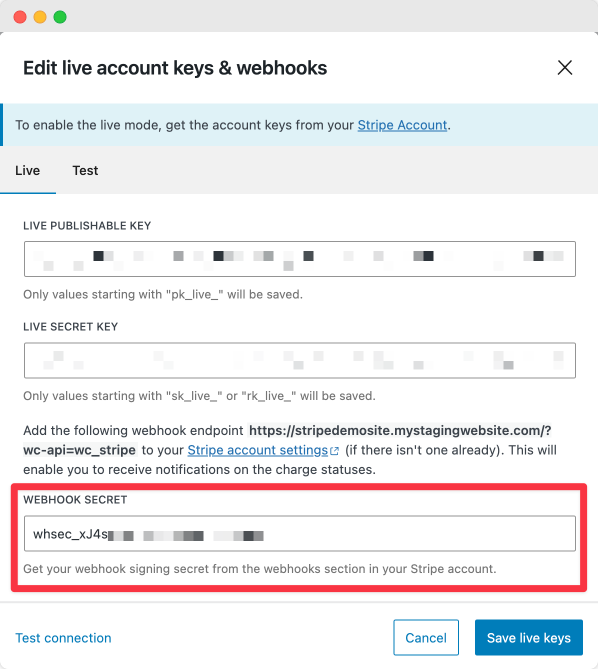
- Secure your Webhook:
- Return to the Stripe dashboard and select the webhook you’ve just created.
- Find the Signing secret section and click on Reveal. Copy the revealed signing secret.
- Enter the Webhook Signing Secret in WooCommerce:
- Go back to your WooCommerce settings (WooCommerce > Settings > Payments > Stripe > Settings).
- Click on Edit account keys, and then in the Webhook Secret field, paste the webhook signing secret. This ensures that the requests from Stripe are authentic.
- Test your connection:
- Click on Test connection to verify the integration is functioning correctly. This step confirms that your WooCommerce site can communicate effectively with Stripe.
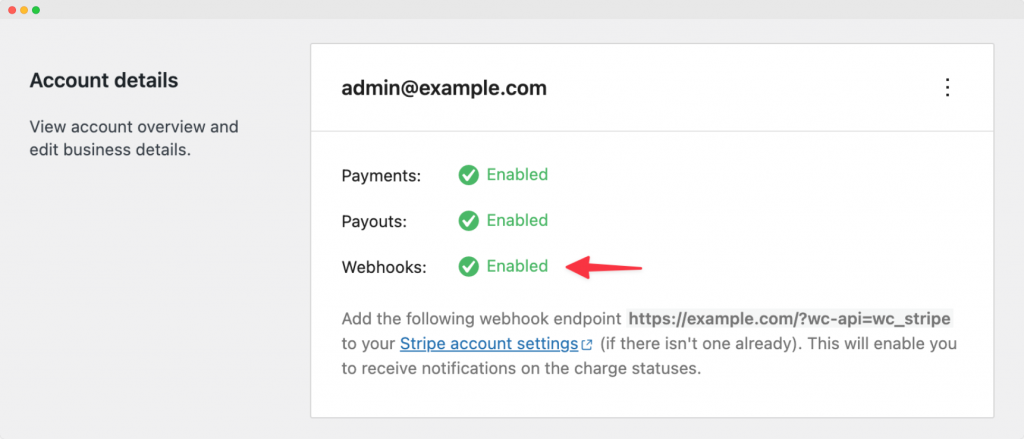
- Save and verify configuration:
- After testing, click “Save live keys”.
- Confirm the integration by ensuring there’s a green Enabled indicator next to Webhooks in your WooCommerce settings.
By following these steps, you’ll establish a robust link between your WooCommerce store and Stripe, enabling your site to react automatically to payment events. This automation enhances operational efficiency and also improves the customer experience by ensuring timely updates and actions based on payment processing events.
Resolving common WooCommerce Stripe Webhook issues effectively
Identifying and resolving issues with WooCommerce Stripe webhooks is essential for maintaining a seamless payment process on your eCommerce site. If webhooks fail to deliver, it can disrupt the automated flow of information, leading to delays in order updates or payment processing.
Here’s how you can effectively pinpoint and address common webhook issues using the Stripe dashboard:
Identifying webhook issues
- Access your Stripe Dashboard: Navigate to Developers > Webhooks.
- Inspect the Webhook Endpoint: Click on the endpoint that’s experiencing issues and switch to the “Failed” tab.
- Analyze Failed Events: Select a failed event, click the three dots button, and choose View Event. Expand the delivery attempt section to see the HTTP status code, which provides insight into the nature of the issue.
Troubleshooting common issues
Once you’ve identified the HTTP status code, you can begin troubleshooting based on the nature of the error:
- “Connection to remote host denied”: This issue typically indicates a problem with the server’s response to Stripe’s request. For guidance on addressing this, Stripe provides detailed troubleshooting steps.
- “TLS error”: A TLS error suggests a security protocol mismatch between your server and Stripe. Resolve this by ensuring your server supports the latest security standards. Check out Stripe’s documentation on fixing TLS errors for more information.
- “Timed out”: This occurs when Stripe’s request to your server takes too long to respond. Improving server response time is crucial for resolving this issue. More information on troubleshooting timeouts can be found in Stripe’s documentation.
- HTTP Status Code 3xx: Redirect errors require you to verify the endpoint URL and ensure it’s correctly configured to receive POST requests. Stripe provides advice on 3xx status codes in their documentation.
- HTTP Status Code 4xx or 5xx: These errors indicate client or server issues, respectively. They often require adjustments in endpoint configuration or server capabilities. Stripe’s documentation also offers troubleshooting tips for 4xx and 5xx status codes.
By utilizing Stripe’s comprehensive support documentation, you can quickly identify and rectify common webhook issues, ensuring your WooCommerce store remains operational and responsive to payment events.
Next steps: Leveraging webhooks for optimized WooCommerce store management
Webhooks are invaluable for ensuring smooth communication between your WooCommerce store and Stripe account. By automating crucial processes such as order status updates following successful payments, they significantly reduce the need for manual intervention, streamlining operations and enhancing efficiency.
However, effectively integrating Stripe webhooks is just the beginning of optimizing your WooCommerce store management. For store owners seeking to truly elevate their operational capabilities, Jovvie offers an attractive solution.
As a platform designed with WooCommerce store optimization in mind, Jovvie offers key features such as inventory synchronization, the ability to handle in-person sales using your existing computer, tablet, or mobile device, and support for managing complex products directly from the point of sale. What’s more, as an official Stripe Partner, Jovvie ensures seamless compatibility with Stripe, promising a robust and cohesive management experience.
Discover how Jovvie’s features can elevate your WooCommerce store management. From enhancing inventory and sales to improving store functionality, Jovvie provides the essential tools for success. Ready to take the next step in enhancing your WooCommerce store? Get started with Jovvie and see how easy and efficient your store management can become.
★★★★★ RATED 4.9/5 BY 5,000+ WOOCOMMERCE STORES
Sell anywhere. Sync to WooCommerce instantly.
Your retail counter, your tradeshow booth, your next pop-up — Jovvie is the only POS built natively for WooCommerce. No duplicate inventory, no failed syncs, no middleware.