
Managing online and physical sales separately usually creates an inventory headache. Products may sell out in-store while showing available online. Staff may manually update stock counts across some systems but not others, leading to customer disappointment when items aren’t actually available.
Setting up a WooCommerce POS eliminates these problems. This guide shows you how to complete your WooCommerce POS setup with automatic inventory synchronization, removing the hurdles commonly found in stock management.
What is a WooCommerce POS system?
A WooCommerce POS is a point-of-sale system that integrates with your WooCommerce online store. The POS system manages in-person transactions and keeps inventory synchronized in real time.
Every in-store purchase automatically syncs to your online inventory, removing manual hiccups. When customers buy products online, your in-store stock updates instantly. This prevents overselling and maintains accurate inventory counts.
WooCommerce POS systems work on tablets, smartphones, and desktop computers, allowing you to sell from anywhere. Staff can process sales, accept payments, and print receipts from multiple devices, connecting your physical and online operations into one unified platform.
Hardware you’ll need for WooCommerce POS setup
Before setting up WooCommerce POS software, gather your hardware components together:
- An iPad, Android tablet, or computer runs the POS software – smartphones come later (see Step 4). Most businesses prefer tablets for their portability and touchscreen interface. Desktop computers work well for fixed checkout counters.
- Barcode scanners speed up checkout by allowing quick product additions. Bluetooth scanners connect wirelessly to mobile devices, and USB scanners plug directly into computers or tablets with adapters.
- Receipt printers provide customer transaction records. Thermal printers connect via Bluetooth or USB, and many POS systems also support email receipts as an eco-friendly alternative.
- Card readers accept credit and debit card payments. Choose readers compatible with your payment processor. Modern readers support chip cards, tap payments, and mobile wallets.
Cash drawers secure cash transactions. Electronic drawers open automatically when sales are complete, whereas manual drawers work without electricity but require keys.
How to set up WooCommerce POS with Jovvie
Follow these steps to configure WooCommerce point of sale with automatic inventory sync.
Step 1: Install the WooCommerce POS plugin
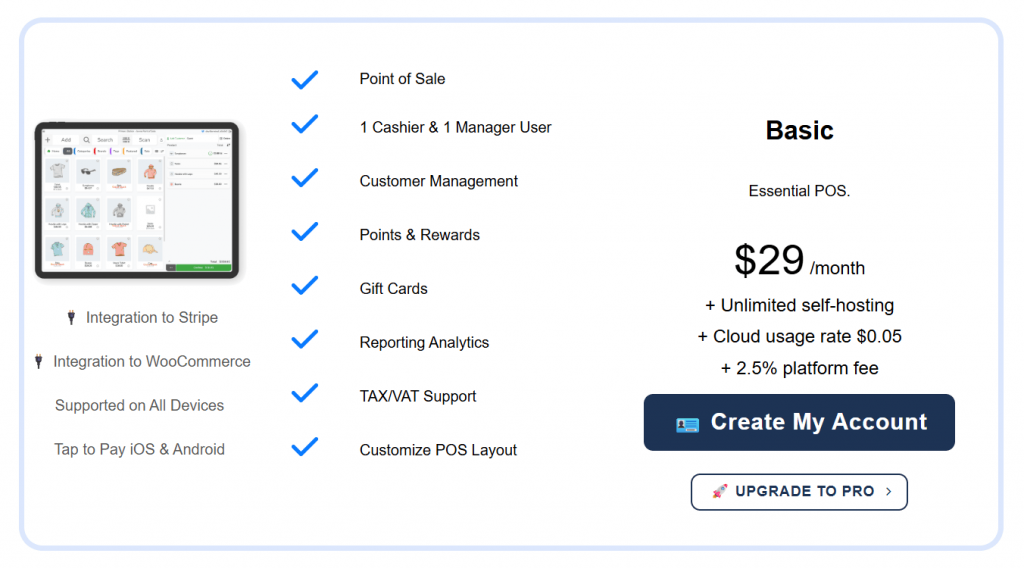
Purchase your Jovvie POS license starting at $29 per month. Download the Point of Sale API connector plugin and Point of Sale WP UI plugin. Both POS plugins are available in your account dashboard.
Navigate to Plugins > Add New > Upload Plugin in WordPress admin. Upload and activate both downloaded plugins. The plugins create a new POS menu in your dashboard.
Jovvie offers a 30-day free trial with full features, and no credit card required.
Step 2: Configure initial POS settings
You can access POS settings through the new POS menu in your WordPress dashboard. Configure store name, address, and receipt headers via general Settings – these details will appear on customer receipts and reports.Set up the payment methods your physical store accepts, enabling cash, card, and other payment options. Configure tax rates to match your local requirements.
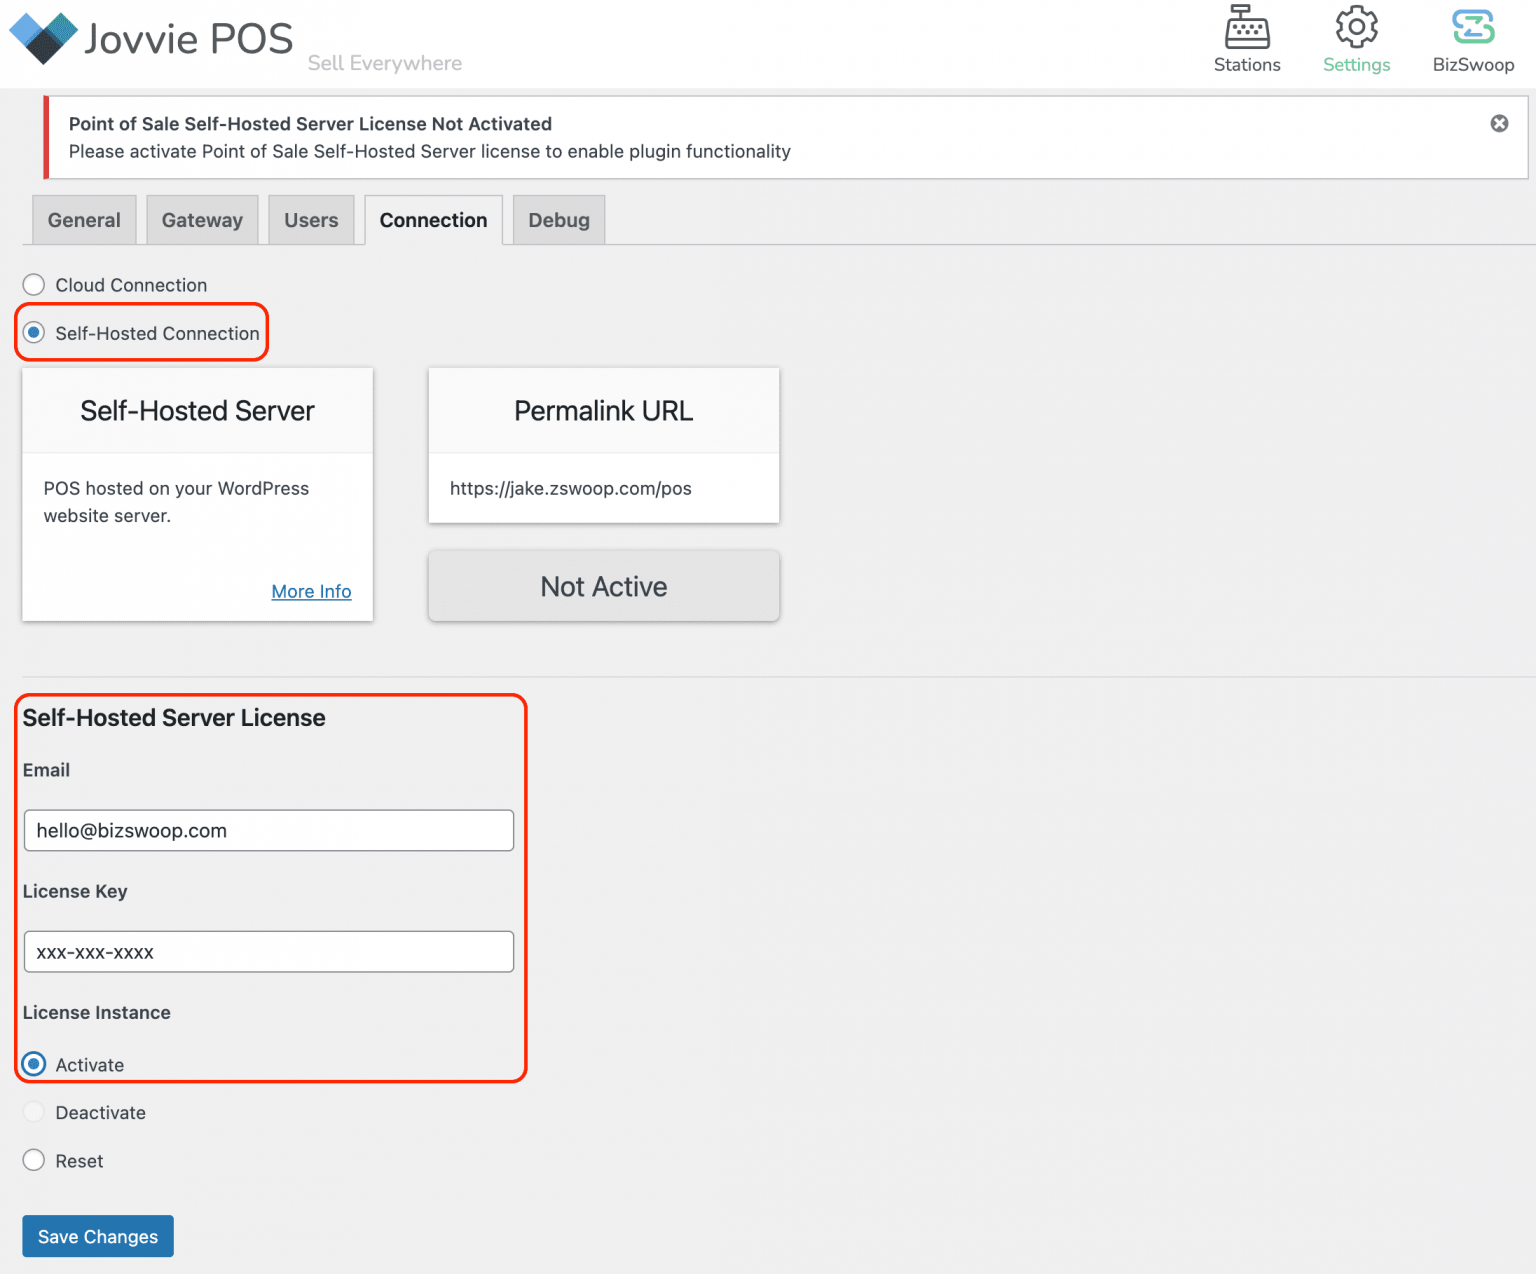
Choose between self-hosted or cloud-hosted options. Self-hosted runs on your existing WordPress hosting, while cloud hosting provides dedicated servers with performance guarantees.
Step 3: Create outlets and registers
Create outlets for each physical location in POS > Outlets. Name each outlet clearly (Main Store, Downtown Location, etc.), then fill in complete address information for each location.
Add registers within each outlet for individual checkout stations. Assign register numbers or names for easy identification, and configure receipt printers and cash drawers for each register.
Multiple registers per outlet allow simultaneous checkouts, which reduces customer wait times during busy periods.
Step 4: Connect your POS device

The BizSwoop app connects iOS and Android devices to your POS system. Download from the App Store for iOS devices, or get it from Google Play for Android devices.
Access the POS through Chrome, Firefox, Safari, Edge, or Opera browsers. Desktop access works without installing additional software. Browser-based POS runs on Windows, Mac, and Linux computers.
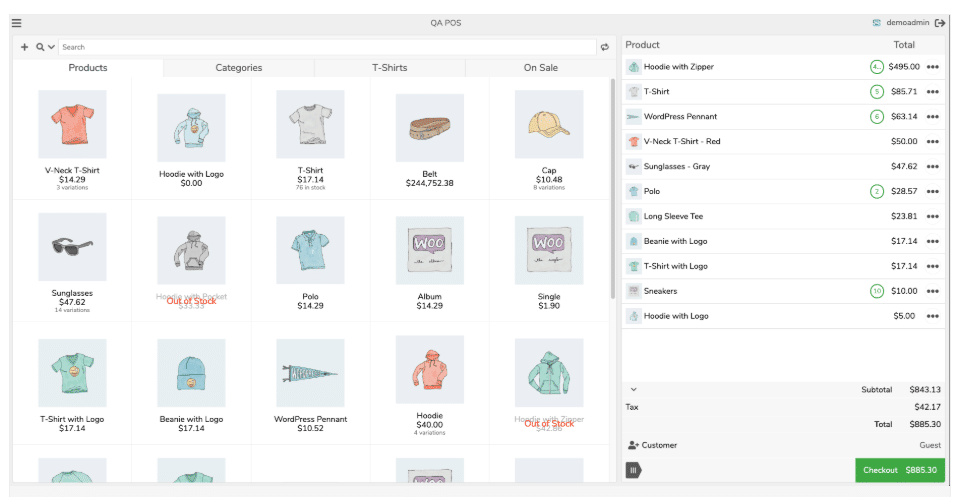
Log in with your WordPress credentials. Select your outlet and register from the dropdown menus. The POS interface loads with your products ready to sell.
Step 5: Configure products and inventory
Products sync automatically between WooCommerce and the POS system, and your existing WooCommerce catalog appears in the POS immediately. New products added online will show up instantly in your store.
You can set initial stock levels in WooCommerce for accurate tracking, so enable stock management on products you want to track. Variable products sync with all variations and attributes.
Use SKUs to quickly find products during checkout. The POS search function finds products by name, SKU, or barcode, and barcode scanning automatically locates the correct product.
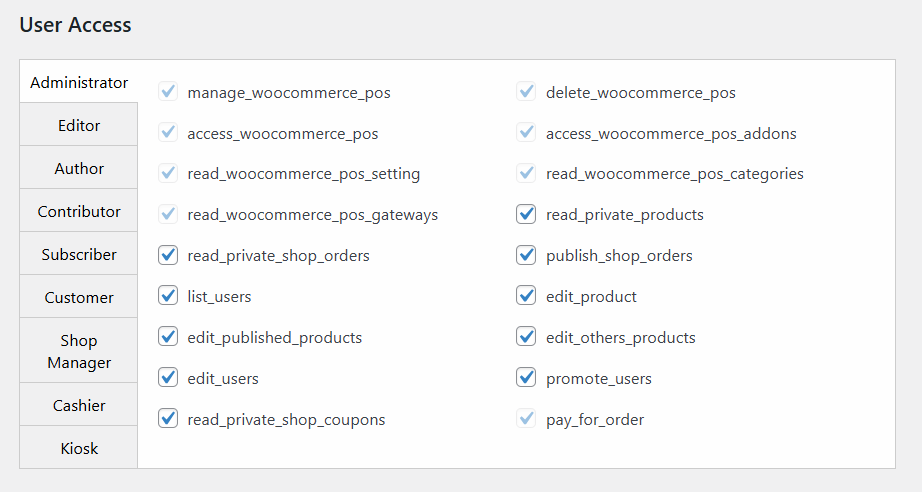
Step 6: Set up POS users
Set up POS users and access levels via POS > Settings > Users. Create cashier accounts with appropriate access levels. Cashiers can process sales but not modify settings, whereas managers get additional permissions for refunds and reports.
Set up POS users and access levels via POS > Settings > Users. Create cashier accounts with appropriate access levels. Cashiers can process sales but not modify settings, whereas managers get additional permissions for refunds and reports.
Step 7: Start processing sales
Your WooCommerce POS setup is now complete. Process your first test transaction to verify everything works – the POS should update inventory immediately when a sale is complete.
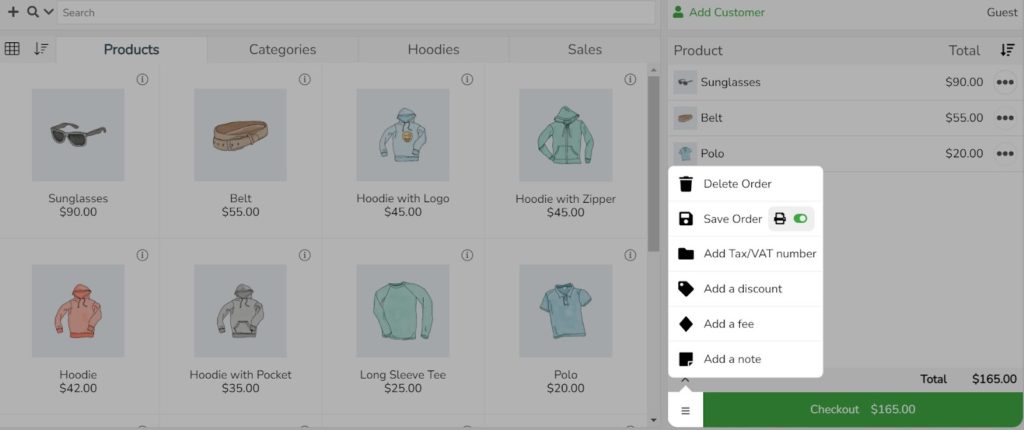
Add products to cart by searching, scanning, or browsing categories. Apply discounts, accept multiple payment types, and print receipts. Double-check that every transaction syncs to your WooCommerce admin, as this should happen instantly.
Track real-time sales data across all channels, and view which products sell best in-store versus online. Analyzing cross-channel stats allows you to make more informed decisions, benefiting your business as a whole.
Real-time inventory tracking features
Jovvie integrates with Stripe Terminal for payment processing, supporting the Stripe Reader M2 and BBPOS WisePad 3. This integration allows you to process payments with zero additional transaction fees, other than Stripe’s percentage and standard charges.
Manual inventory adjustments automatically sync across all channels. You can update stock for damaged or lost items directly in your POS dashboard, with changes reflected across all of your locations.
Low stock alerts will also notify you before products sell out. You can set minimum quantities for automatic reorder reminders, and avoid disappointing customers.
Benefits of synchronized WooCommerce POS
You’ll find fresh benefits as you manage your inventory from day-to-day, but the biggest takeaways are clear.
Synchronized WooCommerce POS eliminates manual inventory updates between systems. You can save hours weekly on stock management tasks, and reduce errors from duplicate data entry.
It also prevents overselling across online and physical channels. Customers see accurate stock availability everywhere – reliable inventory information builds trust.
What’s more, you can process sales anywhere with mobile POS capabilities. Sell at events, markets, or customer locations, and maintain perfect sync regardless of selling location.
Finally you can access unified reporting for better business decisions. Compare channel performance in a single dashboard for convenience, and you’ll be able to identify trends across your entire operation.
Transform your inventory management today
Setting up WooCommerce POS with Jovvie takes less than an hour. Your products, customers, and inventory sync automatically, enabling you to concentrate on increasing sales rather than keeping your stock updated.
If you’re ready to transform your inventory management, start your 30-day free trial today and experience the true power of automated inventory management across all your sales channels.
Jovvie is available as a self-hosted plugin for your WooCommerce store from $39/mo, and comes with a 30-day full feature free trial so you can test everything out before you commit. No credit card required!
You can also choose to get Jovvie as a cloud hosted service, all the features of the self-hosted plugin, plus guaranteed performance on a dedicated server with real-time syncing and updates all taken care of for you. Choose your plan here.
Frequently asked questions about WooCommerce POS setup
How does inventory sync work between online and in-store?
Inventory updates automatically when sales happen online or in-store. The synchronization prevents overselling across all channels, so stock levels reflect in real-time across your entire business.
When customers purchase online, the POS shows your reduced inventory. Likewise, in-store sales decrease online stock, maintaining accuracy without manual intervention.
What hardware is compatible with Jovvie POS?
Jovvie supports Stripe Reader M2 and BBPOS WisePad 3 card readers. Any Bluetooth barcode scanner connects to iOS and Android devices. USB and Bluetooth scanners work with desktop setups.
Most thermal receipt printers work via standard protocols. Star, Epson, and other major brands connect easily, and the system also supports network printers for multiple registers.
Can I use Jovvie POS offline?
Jovvie requires an internet connection for real-time synchronization. The system works anywhere with WiFi or cellular data connection. This ensures your inventory stays accurate across all sales channels.
Mobile hotspots provide connectivity at temporary locations. Events and markets become viable selling venues, and your inventory remains synchronized regardless of your location.