
You connect WooCommerce to Stripe Terminal by installing a WooCommerce POS plugin that wraps the Stripe Terminal SDK, connecting it to your Stripe account, registering a Stripe-certified reader, and running a test transaction — about 30 minutes start to finish if your prerequisites are in place, because WooCommerce has no built-in Terminal support and the plugin supplies the register, the Stripe connection, and the reader pairing for you. The work is not writing code against the Terminal API; it is installing the right plugin, completing a guided Stripe connection, and pairing hardware. This guide walks every step in order.
Key Takeaways
- Have four things ready first: a live WooCommerce store, a Stripe account, a supported Stripe Terminal reader, and a WooCommerce POS plugin.
- Install the POS plugin like any WordPress plugin (about two minutes), then connect to Stripe through the guided Stripe Connect onboarding.
- Register and pair your reader: the S700 joins over Wi-Fi or Ethernet; the WisePad 3 and M2 pair over Bluetooth.
- Run a test sale and confirm the order lands in WooCommerce with stock decremented and the charge shows in Stripe.
- The whole setup takes about 30 minutes with a pre-built POS.
- Most setup errors are connectivity or Stripe-connection issues — the troubleshooting section lists the quick fixes.
We have built WooCommerce point-of-sale on Stripe Terminal for eight years — for boutiques, cafes, pop-ups, and multi-location retailers in more than 30 countries — and the single most common thing we hear is “I already run WooCommerce and Stripe online; how hard is it to take cards in person?” The honest answer: the payment plumbing is straightforward and Stripe documents it well; the part people underestimate is the register around the payment — catalog lookup, cart, tax, receipt, and the sync back into WooCommerce. A POS plugin like Jovvie handles that layer so the 30 minutes is genuinely 30 minutes.
This is a setup walkthrough in our WooCommerce Stripe Terminal library. For the architecture, hardware, and pricing context behind these steps, read the complete Stripe Terminal for WooCommerce implementation guide. Once you are live, you will likely want the self-hosted vs cloud-hosted WooCommerce POS guide and the Stripe Terminal refunds workflow next.
What do you need before you start?
Before you begin, you need a working WooCommerce store, a Stripe account, a supported Stripe Terminal reader, and a WooCommerce POS plugin — having all four ready is what keeps this to 30 minutes.
Here is the full prerequisite checklist:
- A live WooCommerce store on WordPress, with products and prices already set up. WooCommerce 8.0+ is recommended, and if you have enabled High-Performance Order Storage (HPOS), confirm your POS plugin supports it — Jovvie does.
- A Stripe account that can accept payments in your country. Stripe Terminal is available in the US, Canada, UK, most of the EU, Australia, and a growing list of others; check the Terminal availability page for your region.
- A supported reader. The simplest starting points are the Stripe Reader M2 ($59) or Tap to Pay on a supported iPhone or Android device (no hardware purchase). For a counter, the Stripe Reader S700 ($349) or BBPOS WisePad 3 ($59) are common. Order hardware ahead of time — this is usually the only step with a lead time.
- A WooCommerce POS plugin that integrates Stripe Terminal — Jovvie is the one we build and use throughout this guide.
- An internet connection for the device running the register and for the reader itself.
If all five are in place, set a timer. If your reader has not arrived yet, you can still complete the software steps and test with Tap to Pay or in Stripe test mode.
How do you install the WooCommerce POS plugin?
You install the POS plugin from your WordPress dashboard the same way you install any plugin — upload or search, install, and activate — which takes about two minutes.
In your WordPress admin, go to Plugins → Add New. If you purchased Jovvie, upload the plugin ZIP via Upload Plugin; otherwise search for it in the directory. Click Install Now, then Activate. After activation you will see a new POS menu item in your WordPress sidebar.
A note on why a plugin and not raw code: WooCommerce ships no native Terminal register, so something has to turn the Terminal SDK into a usable point of sale — product search, cart, tax, tendering, receipts, and WooCommerce order creation. You can build that yourself against the Terminal SDK, but that is a development project, not a 30-minute setup. The plugin route exists precisely so you skip it. The complete implementation guide covers the build-vs-buy decision in depth.
How do you connect the plugin to your Stripe account?
You connect to Stripe through a guided Stripe Connect onboarding flow launched from the plugin settings — you click Connect, authorize on Stripe’s site, and you are returned to WooCommerce authenticated.
This is the step that makes Terminal work, and it uses Stripe Connect so the plugin can create connection tokens and register readers on your behalf without you handling raw API keys. The flow Stripe documents for platforms is at stripe.com/terminal/payments/connect; the plugin implements it for you.
- In WordPress, open the POS plugin settings and find the payments or Stripe section.
- Click Connect to Stripe (or Create or connect an account). You are redirected to a Stripe-hosted page at connect.stripe.com.
- Sign in to your existing Stripe account or create a new one. Choose the account that holds your online payments if you want in-person and online sales to reconcile together.
- Authorize the connection. Stripe returns you to your WordPress settings, now showing a connected status.
Once connected, the plugin can request the connection tokens the Terminal SDK needs and manage your readers. Tip: connect the same Stripe account you use for your WooCommerce online checkout, so in-person and online orders settle into one account, one payout schedule, and one reporting view.
How do you register and pair a Stripe Terminal reader?
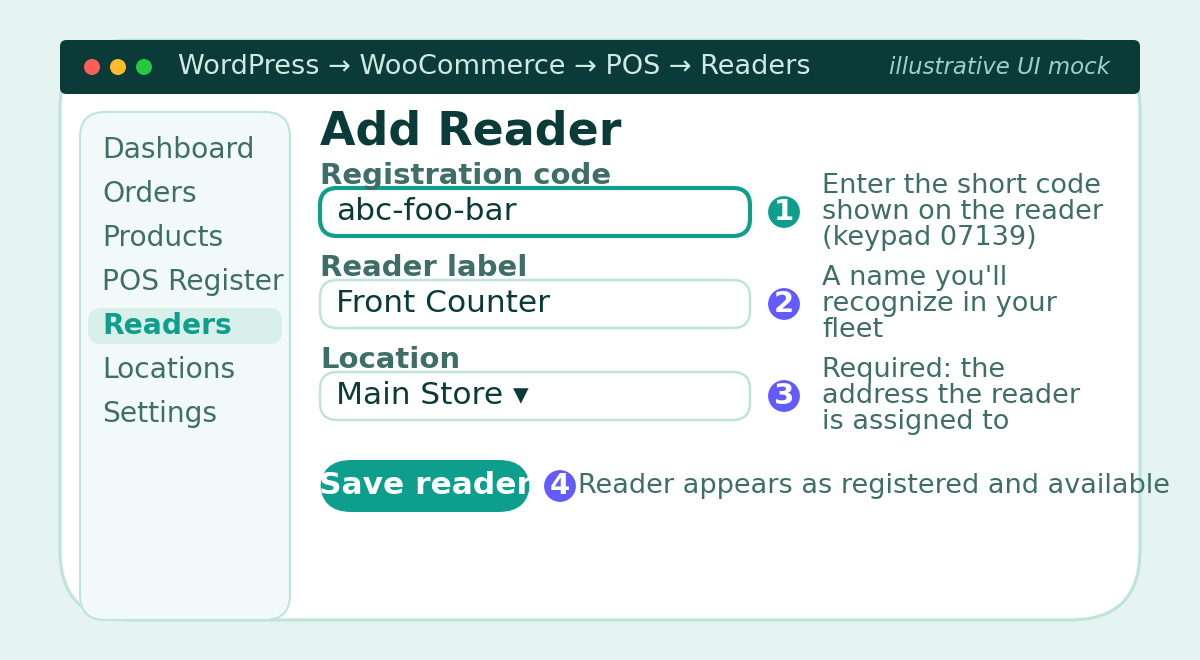
You register a reader by generating a short registration code on the device and entering it in the plugin, which pairs the reader to your account and location — usually under five minutes per reader.
The exact step depends on the reader, but the pattern is the same. Make sure the reader is powered on and connected to the internet first.
For a smart reader (S700 / WisePOS E):
- On the reader’s screen, enter the settings keypad code
07139to reveal a registration code (a short three-word code). - In your WordPress POS plugin settings, open Readers (or Terminal) and click Add Reader.
- Enter the registration code from the device, give the reader a recognizable label (for example, “Front Counter”), and assign it to a Location.
- Save. The reader appears as registered and available.
For a Bluetooth reader (M2 / WisePad 3):
- Charge the reader and turn it on.
- In the POS app on your phone or tablet, choose Connect a reader and select your device from the discovered list over Bluetooth.
- Allow any firmware update to complete on first pairing.
For Tap to Pay (iPhone or Android):
- Open the POS app on a supported device.
- Choose Tap to Pay as the reader and accept the on-device terms the first time.
- No hardware to register — the phone is the reader.
A Location in Stripe Terminal is the address a reader is assigned to; it is required for registration and it is what the Locations API uses to organize multi-site fleets. Create at least one location before registering your first reader — the plugin will prompt you if you have not.
Which reader should you start with?
Start with Tap to Pay or the Stripe Reader M2 if you want the fastest, cheapest path; choose the S700 if you need a dedicated countertop device with a customer-facing screen.
The reader you pick changes nothing about the WooCommerce connection — the plugin and Stripe Connect steps are identical — so choose on cost, form factor, and where you sell.
| Reader | Price | Best for | Pairing |
|---|---|---|---|
| Tap to Pay (iPhone/Android) | $0 | Mobile, pop-ups, field sales, testing today | No hardware; on-device |
| Stripe Reader M2 | $59 | A simple, cheap dedicated reader at a small counter | Bluetooth |
| BBPOS WisePad 3 | $59 | Counters needing an on-device PIN pad | Bluetooth |
| Stripe Reader S700 | $349 | A fixed counter wanting a smart, customer-facing screen | Wi-Fi / smart |
If you are not sure, begin with Tap to Pay — it lets you complete this entire setup and run a real sale before any hardware arrives — then add an S700 or M2 once you know your counter workflow. The full trade-offs, lifespan, and total-cost comparison live in the complete 2026 Stripe Terminal hardware guide.
Reader paired — ready to sell in person?
Jovvie is the WooCommerce POS that drives your Stripe Terminal reader from the same store you manage online.
Start your free trial →How do you run a test transaction?
You confirm everything works by running a small live test sale (or a test-mode sale) through the POS, completing it on the reader, and verifying the order lands in WooCommerce and the payment in Stripe.
- Open the POS register from your WordPress dashboard or POS app.
- Add a low-value product to the cart — or create a $1.00 test item.
- Choose card as the payment method and select your registered reader.
- Tap, dip, or swipe a real card on the reader (or use Stripe’s test cards if you connected in test mode).
- Wait for the approval on the reader screen and the POS confirmation.
- Verify in two places: the order appears under WooCommerce → Orders with the correct total and a “completed/processing” status, and the payment appears in your Stripe Dashboard → Payments with
card_presentas the method.
If both records match, your integration is working end to end. Refund the test charge from the Stripe Dashboard or your POS when you are done — the Stripe Terminal refunds workflow covers in-person refunds in detail.
What are the most common setup errors and how do you fix them?
Most setup failures come down to four things: the reader not being on the same network, an incomplete Stripe connection, a missing location, or an out-of-date reader firmware — and each has a quick fix.
| Symptom | Likely cause | Fix |
|---|---|---|
| Reader not found during pairing | Reader and POS device on different networks, or Bluetooth off | Put both on the same Wi-Fi; enable Bluetooth and location permissions for the POS app |
| “Failed to create connection token” | Stripe connection incomplete or expired | Reconnect the account in plugin settings; confirm the Connect flow finished and returned a connected status |
| Registration code rejected | Code expired (they are short-lived) or typo | Regenerate the code on the reader (07139) and re-enter it promptly |
| Reader stuck on “updating” | First-pairing firmware update | Keep the reader powered and on Wi-Fi until the update completes; do not interrupt it |
| Payment declines in live mode only | Account not fully activated for card-present | Complete any pending Stripe account verification; confirm Terminal is enabled for your country |
| Order not appearing in WooCommerce | Plugin/WooCommerce permissions or HPOS mismatch | Confirm the POS plugin version supports your WooCommerce/HPOS setup; re-check order-sync settings |
| Tap to Pay unavailable | Unsupported device or OS version | Verify the device is on Stripe’s supported list and the OS is current |
If a reader pairs but payments fail, the issue is almost always the Stripe account (verification or country enablement), not the hardware. If the hardware will not pair at all, it is almost always the network. Splitting the problem along that line resolves most setups in minutes.
Frequently asked questions
How long does it really take to connect WooCommerce to Stripe Terminal?
About 30 minutes if your prerequisites are ready: roughly 2 minutes to install the plugin, 5 to connect Stripe, 5 to register a reader, and a few more for a test sale and settings. The variable is hardware lead time — order your reader in advance, because that is the only step you cannot do instantly.
Do I need to know how to code to set up Stripe Terminal on WooCommerce?
No. With a WooCommerce POS plugin like Jovvie, setup is install, connect Stripe, register a reader, and test — all from the WordPress dashboard, no code. You only need development if you choose to build a custom register directly on the Terminal SDK instead of using a plugin.
Can I use the same Stripe account for online and in-person WooCommerce payments?
Yes, and you should. Connecting the Stripe account that already handles your WooCommerce online checkout means in-person and online sales settle into one account, share one payout schedule, and reconcile in one reporting view. It is the main advantage of using Terminal over a separate, disconnected card machine.
What’s the cheapest way to start taking in-person payments on WooCommerce?
Tap to Pay on a supported iPhone or Android costs $0 in hardware, and the Stripe Reader M2 is $59 if you prefer a dedicated reader. Stripe Terminal has no monthly fee and charges 2.7% + 5¢ per in-person transaction, so the only real cost to start is the reader (if any) and your processing rate.
Why isn’t Stripe Terminal built into WooCommerce already?
WooCommerce is an e-commerce engine; it processes online card payments through the Stripe gateway but ships no card-present register. Stripe Terminal is a separate product driven by the Terminal SDK. A POS plugin is the bridge that turns Terminal into a working WooCommerce register — which is why this guide centers on installing one rather than configuring a built-in feature.
What information syncs back to WooCommerce after an in-person sale?
With a proper WooCommerce POS plugin, a Terminal sale creates a real WooCommerce order: the line items, quantities, totals, and tax are written to WooCommerce → Orders, inventory is decremented against the same stock as your online store, and the customer can be attached to an existing WooCommerce account. The matching card_present payment lands in your Stripe Dashboard with the same payout as your online sales. That two-way consistency — one catalog, one stock count, one customer list, one Stripe account — is the entire reason to run Terminal through WooCommerce rather than a standalone card machine that reconciles nowhere.
Does Stripe Terminal work with WooCommerce HPOS and existing extensions?
Yes, with a plugin built for it. Jovvie supports High-Performance Order Storage (HPOS), so in-person orders are written to the same order tables as online orders. Compatibility with other extensions — subscriptions, gift cards, points and rewards, and tax plugins — depends on the POS layer; these in-person scenarios are covered as their own cluster pieces in the WooCommerce Stripe Terminal library. If you run a complex extension stack, confirm support before go-live rather than discovering a gap at the counter.
You’re live — what’s next?
Once your test sale clears and shows up in both WooCommerce and Stripe, you have a working in-person register on your existing store. From here, configure your tax, receipts, and staff permissions, and read the complete Stripe Terminal for WooCommerce implementation guide to get the most out of the deployment.
Want to skip the build entirely and have a WooCommerce-native register that wraps Stripe Terminal out of the box? Start your free Jovvie trial and run your first in-person sale today — same products, same inventory, same Stripe account as your online store.
Run Stripe Terminal on WooCommerce with Jovvie
Jovvie is the WooCommerce-native point of sale built on Stripe Terminal — take in-person payments, sync every sale to your store, and keep one system of record. Start free, no credit card required.
