
How to Accept In-Person Payments with Jovvie and Gravity Forms
Jovvie Payments makes it possible to add in-person payments to Gravity Forms in just a few minutes. Jovvie is a payments solution of BizSwoop that uses Stripe payment processing and terminal readers to create a secure and trusted in-person payment solution used by millions worldwide.
By the end of this guide, you’ll be equipped to accept payments seamlessly through swipe, insert, or tap — right from your phone, tablet, or Stripe Terminal device. You’ll have your reader fully set up and a Jovvie payment feed added to your Gravity Form. All payments flow directly into your Stripe account, and every submission stays a normal Gravity Forms entry with its payment status, transaction ID, and refund history in one place.
What you need to set up in-person payments
- Gravity Forms 2.5 or later — on WordPress 6.0+ with PHP 7.4+
- Jovvie Payments Gateway for Gravity Forms plugin
- A device reader — or a phone that supports Tap to Pay
- A Stripe account — create a new one or log in to an existing one
Install and Activate the Jovvie Add-on
Follow these steps to install and activate the Jovvie add-on for Gravity Forms.
- Download the Jovvie Payments Gateway for Gravity Forms plugin
.zipfile you received via email. - Log in to your WordPress admin dashboard.
- Navigate to Plugins and select Add New Plugin.
- Select Upload Plugin and choose the
.zipfile from your downloaded files. - Select Install Now, then Activate the plugin once it finishes uploading.
After activating, you will see Jovvie Payments Gateway for Gravity Forms listed under your installed plugins, and a new Jovvie Payments item under Forms → Settings.
Future plugin updates are delivered directly to your WordPress dashboard under Dashboard → Updates — there is no need to re-upload the ZIP.
Connect Jovvie Payments with Your Stripe Account
Follow these steps to set up Jovvie to collect in-person payments through Stripe.
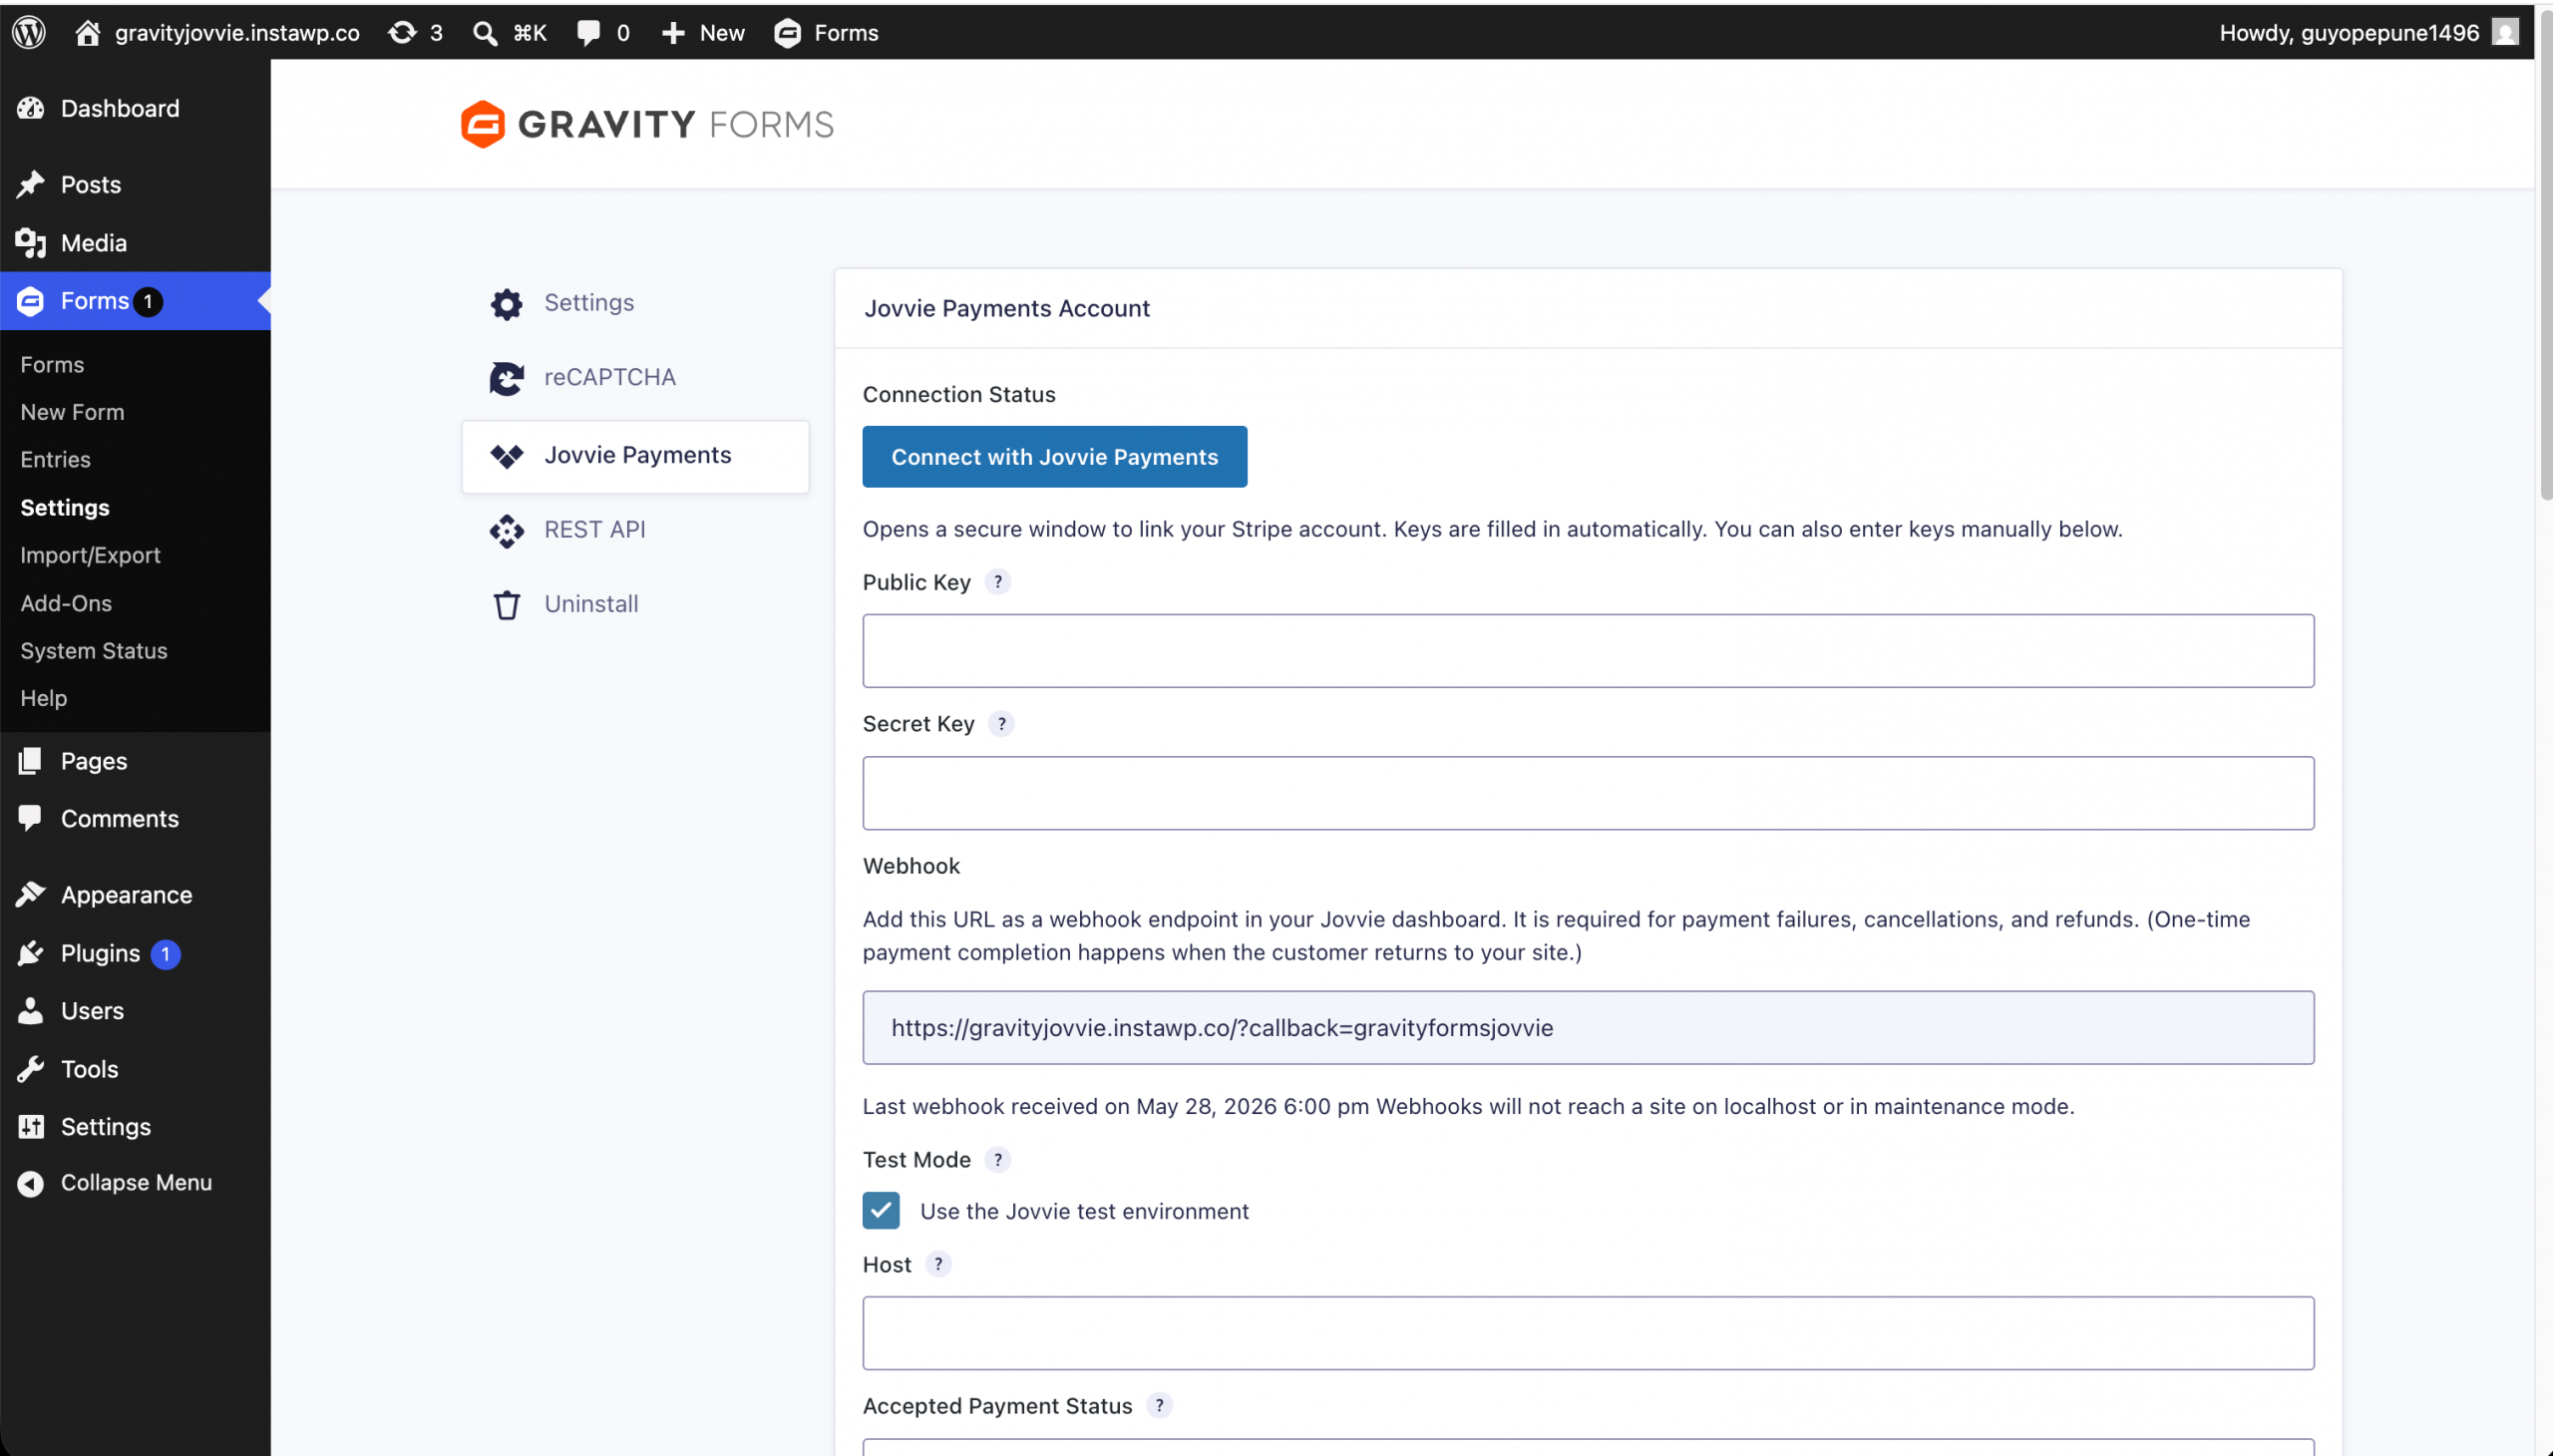
- In your WordPress dashboard, select Forms → Settings → Jovvie Payments.
- Under Jovvie Payments Account, find Connection Status.
- Select the Connect with Jovvie Payments button, which will automatically open a secure pop-up window to get started connecting with Stripe.
Create a Jovvie Account and Link it with Stripe
Follow these steps to get a Jovvie account and link your Jovvie account with Stripe.
- Select Get Started and enter your name, email, and password to create your Jovvie Payments account.
- Once logged in, confirm the Stripe account you want to connect by following the prompt and selecting Connect.
- Once connected, select Connect My Site to securely link your WordPress site with Jovvie Payments. The necessary keys are automatically generated and filled in on your Jovvie Payments settings.
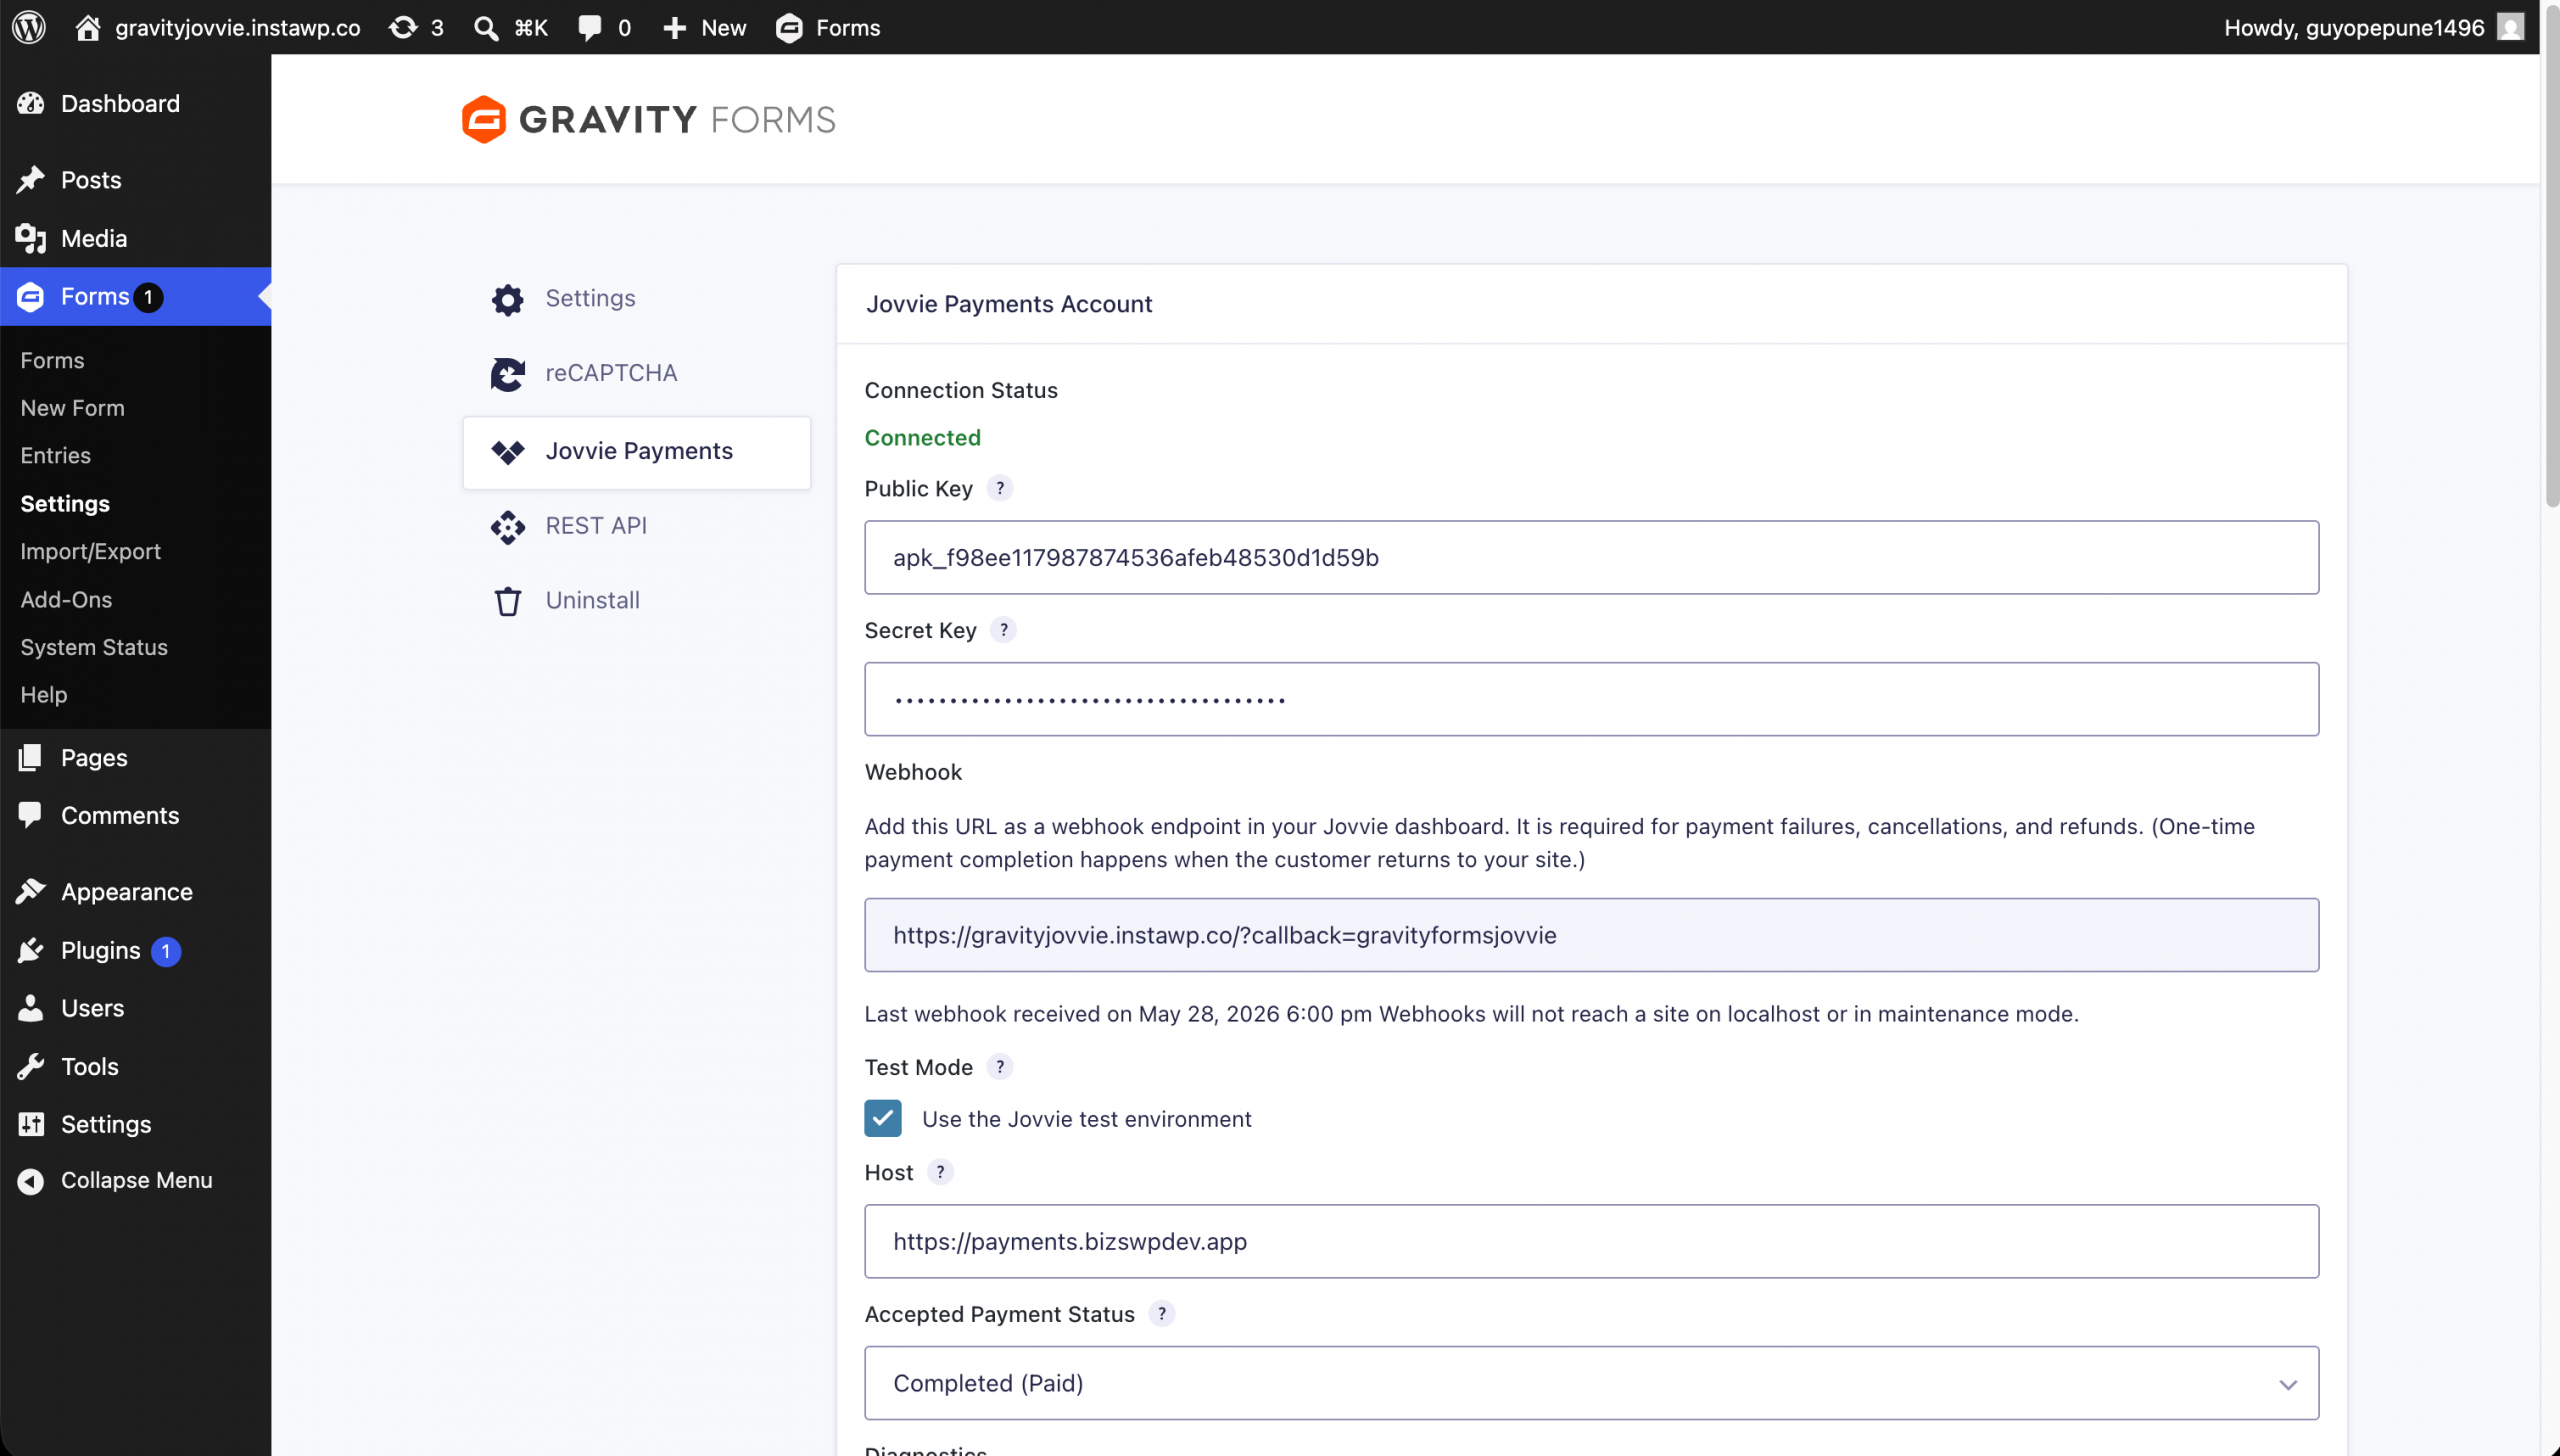
When the window completes, your Public Key and Secret Key are populated automatically and Connection Status displays a green Connected.
You are now officially connected to Jovvie Payments and can accept in-person payments with Gravity Forms.
Note: You can also paste the Public Key and Secret Key manually into the same screen. The same keys are used for both live and test payments — the Test Mode checkbox switches the environment, not the keys.
Add the Webhook to Your Jovvie Dashboard
Successful payments are completed when the customer returns to your site, but payment failures, cancellations, and refunds are delivered by webhook — so this step is required.
- On Forms → Settings → Jovvie Payments, find the Webhook field. It displays a URL in the form
https://yoursite.com/?callback=gravityformsjovvie. - Select the field to copy the URL, and add it as a webhook endpoint in your Jovvie dashboard.
- After your first test payment, the Webhook field displays the time the last webhook was received, so you can confirm delivery.
Note: Webhooks cannot reach a site running on localhost or in maintenance mode.
Create a Location and Register Your Reader
You must create a location to use your payment terminal reader. Follow these steps to complete the process.
- On Forms → Settings → Jovvie Payments, scroll to Location & Terminals.
- For Location ID, choose one of the following:
- Create location — enter the location address in the provided fields (Address Line 1, Address Line 2, Postal Code, City, Country, State/Province), then Update Settings. The location is created in both Live and Test mode.
- Custom Location ID — enter an existing Stripe Location ID if you already have one.
- The Current Location panel then displays your Live and Test location IDs along with every reader registered to them and its online status.
If you’re using the Stripe Reader S700 or the BBPOS WisePOS E
The device must be registered. Power on the device reader and a prompt will display with a unique registration code.
- Scroll to Reader Registration.
- Choose the Mode — Live or Test — to match where you want the reader registered.
- Enter the code in Registration Code and assign a Reader Label for easy identification.
- Select Update Settings.
The reader is now registered and displays as Online under Current Location, indicating it is ready to accept payments.
If you’re using the Stripe M2, BBPOS WisePad 3, or Tap to Pay
Go to Set Up Tap to Pay and Bluetooth Device Readers to complete setup.
Optional — Reader Type: under Location & Terminals, you can limit which reader types are offered on the Jovvie hosted payment page: All (default), Web terminals, or Jovvie App terminals.
Add Jovvie Payments to Your Form
Gravity Forms needs a payment feed to tell the form to charge through Jovvie. Your form also needs a pricing field — a Product, Total, or Donation field — that produces the amount to charge.
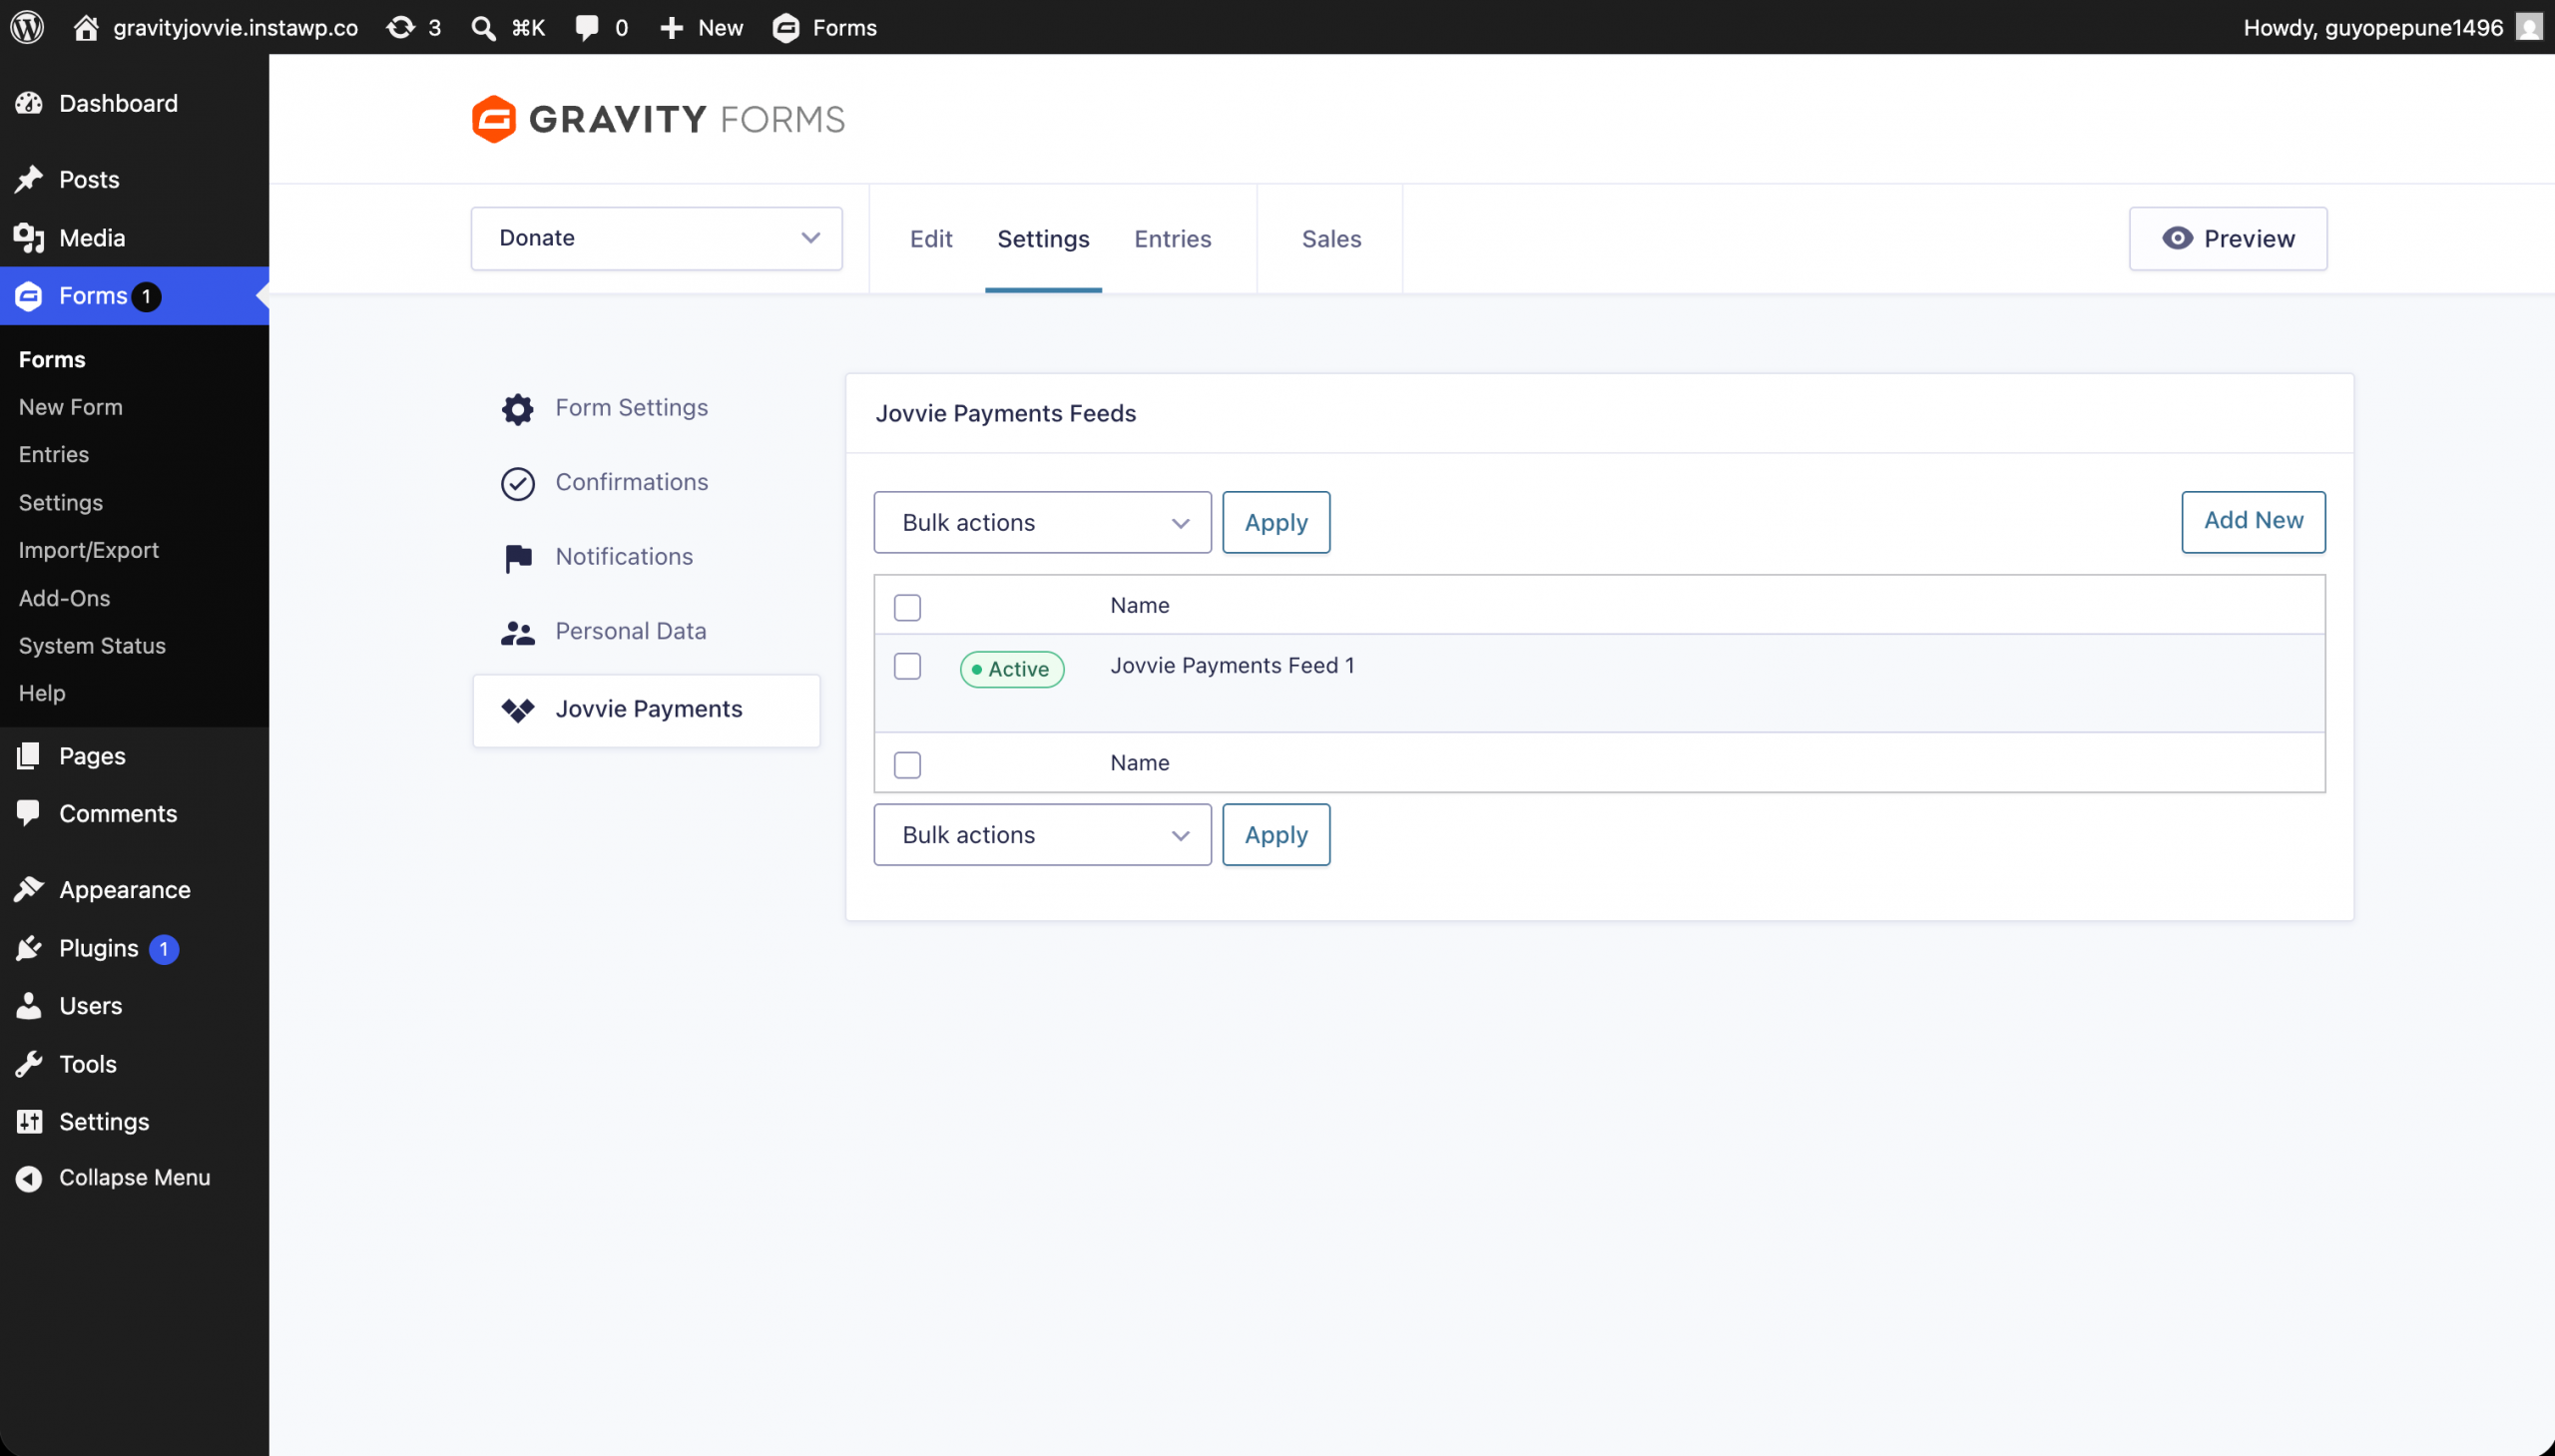
- Open the form and navigate to Settings → Jovvie Payments, then select Add New.
- Give the feed a Name to identify it.
- Optionally set a Description. This text appears on the Jovvie hosted checkout, and Gravity Forms merge tags are supported.
- Optionally enable Conditional Logic so payment is only processed when your conditions are met.
- Select Save Settings.
Optional but recommended: in the form editor, drag the Jovvie Payments field (found under Pricing Fields) onto your form. It collects no card data — it displays a “Secure payment by Jovvie” notice letting the customer know they’ll be redirected to complete payment, and it shows a test-mode warning while Test Mode is on.
Start Accepting In-Person Payments
Run a test first: enable Test Mode on Forms → Settings → Jovvie Payments, then submit the form yourself.
- Open the page where your form is embedded, fill it out, and select Submit.
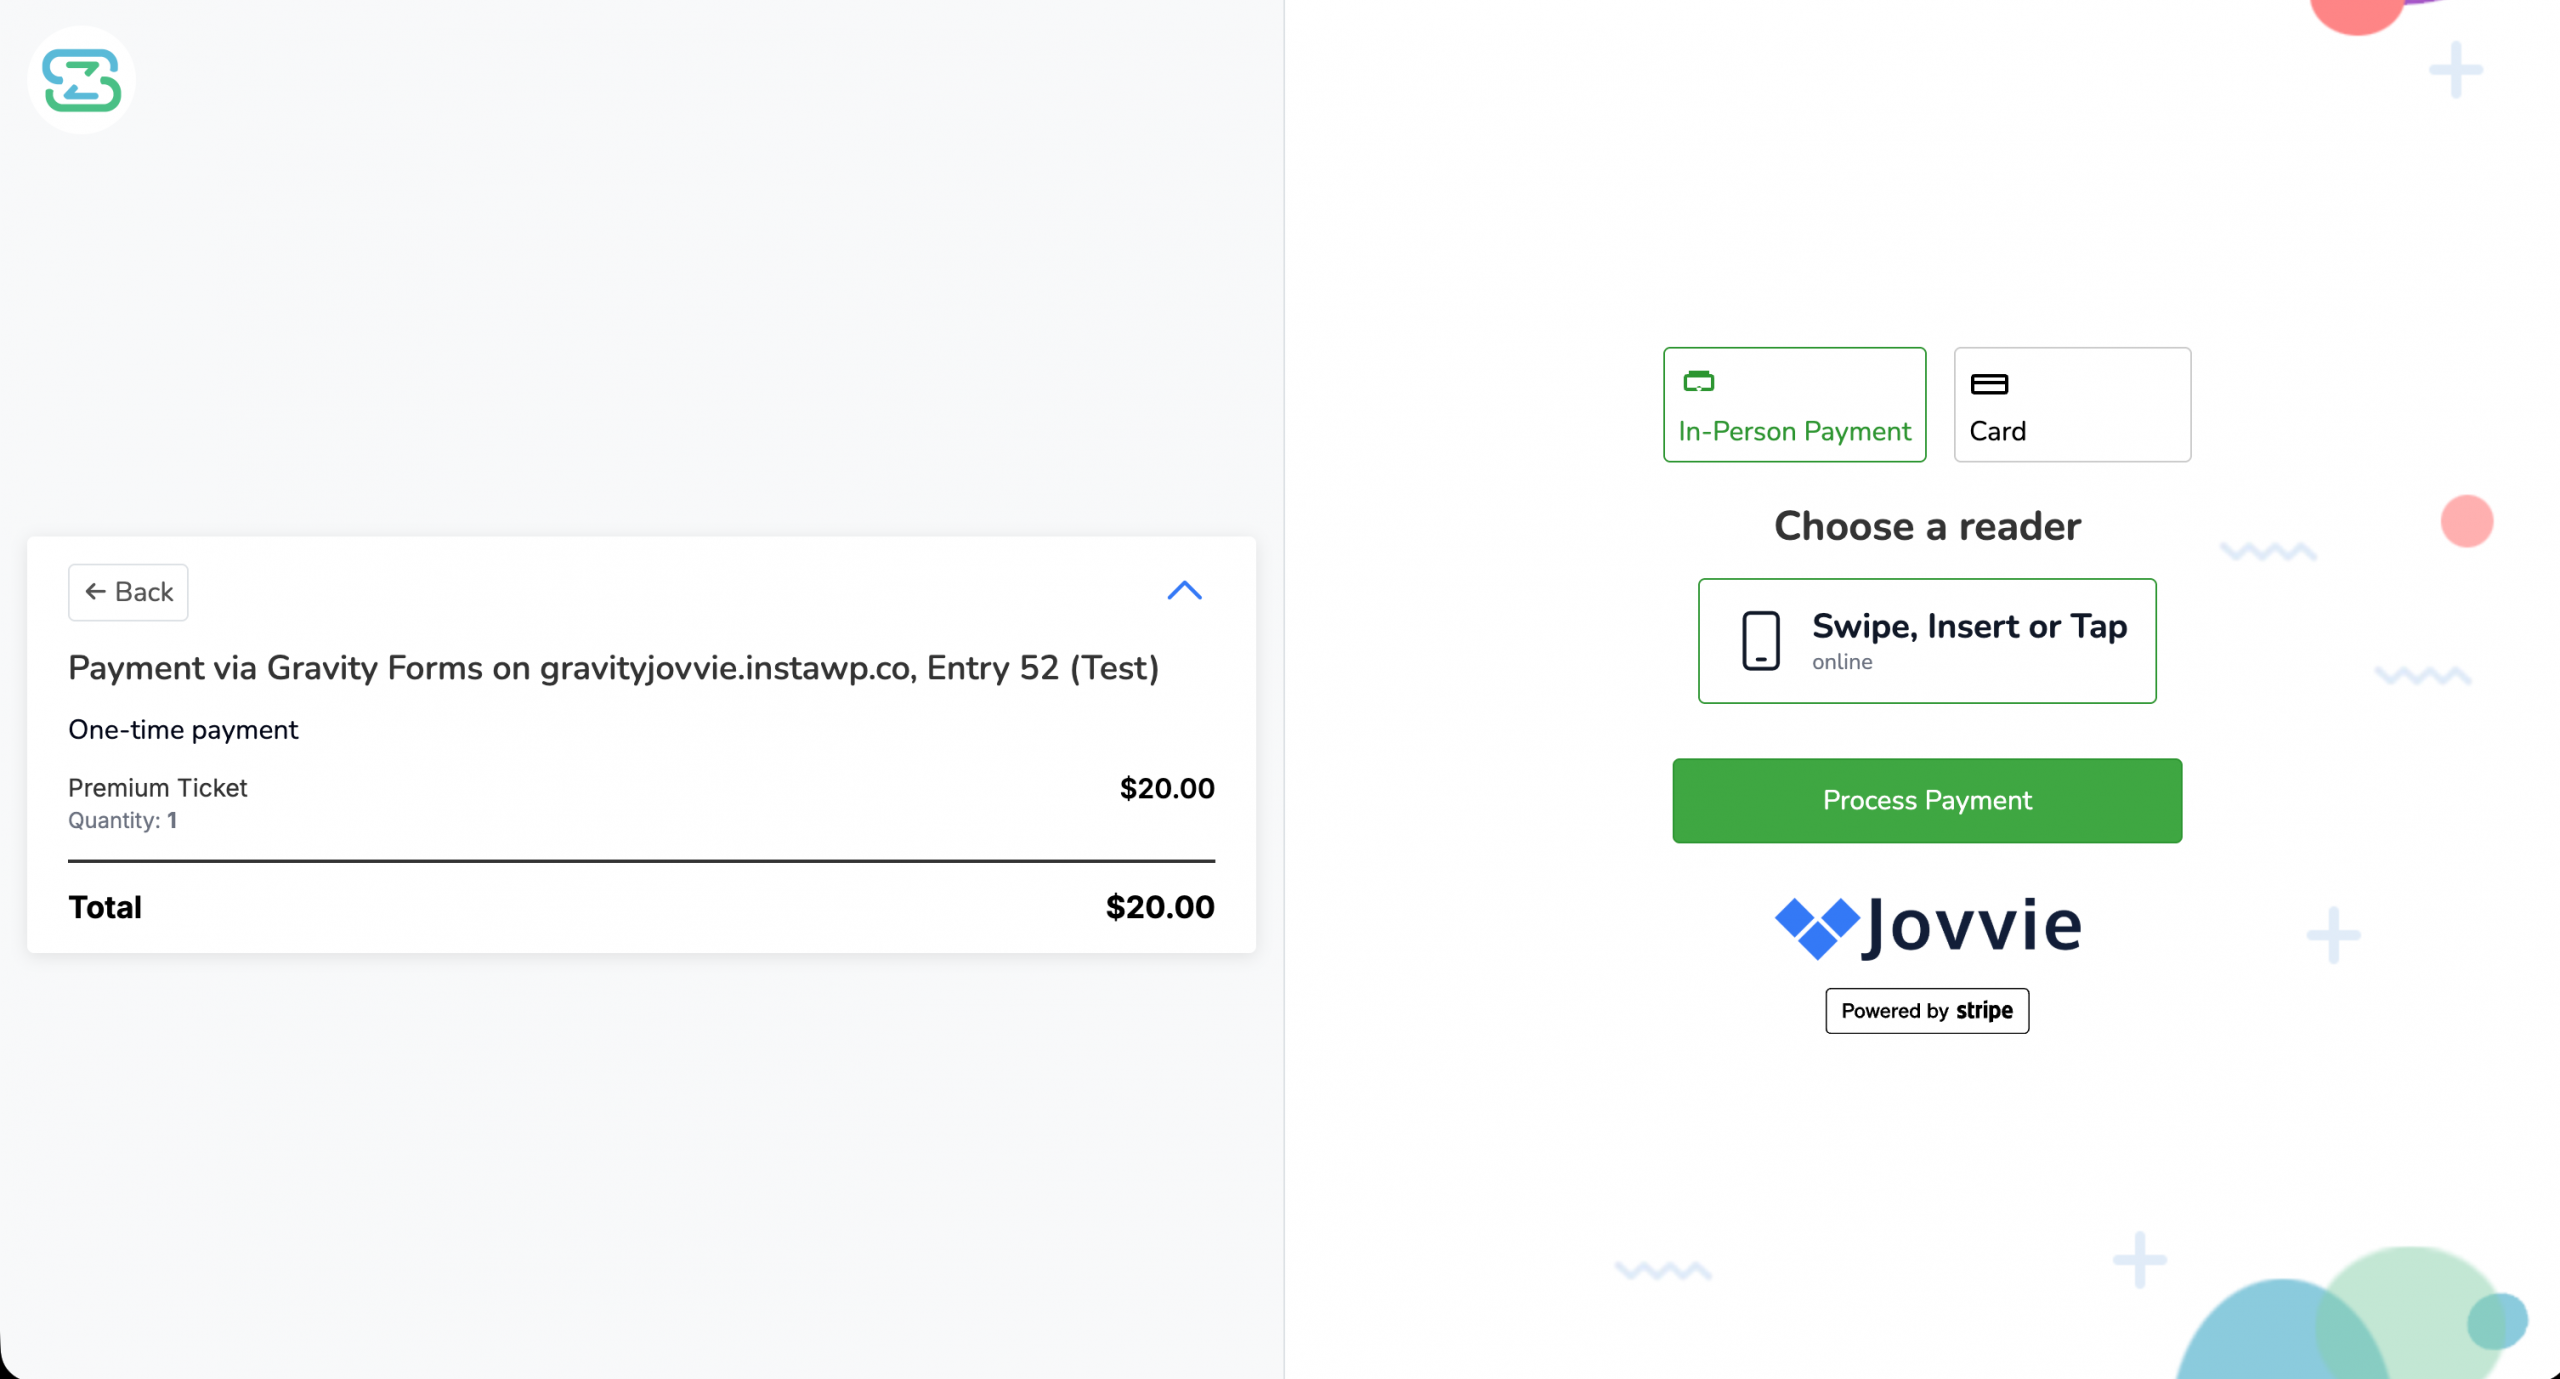
- You are taken to the secure Jovvie Payments hosted checkout page.
- The registered payment reader will activate, allowing you to process the payment by tapping, inserting, or swiping the card or device. Apple Pay, Google Pay, and manual card entry are also available depending on your setup.
- Once the payment is successfully processed, you are redirected back to your site and the form’s normal Gravity Forms confirmation is displayed.
- The entry’s payment status changes to Paid.
When your test looks good, uncheck Test Mode and you’re live. Congrats — you’re officially accepting in-person payments on Gravity Forms.
Set Up Tap to Pay and Bluetooth Device Readers
The Jovvie app allows in-person payments with any reader and is required for Bluetooth-enabled devices and Tap to Pay on iOS and Android devices with NFC capabilities.
Download the Jovvie app
- Get the Jovvie app on the Apple App Store.
- Get the Jovvie app on the Google Play Store.
These links are also shown in the Terminals panel under Location & Terminals.
Set up the Jovvie app to accept payments
- After installing the Jovvie app on your device, launch the app.
- Tap the Jovvie icon in the upper-right corner.
- Copy the URL of the WordPress page where your Gravity Form is embedded. Gravity Forms are embedded in pages or posts, so this is the public page URL — not a URL inside the form editor.
- Tap to edit the Home URL, and enter that page URL.
- Link your Jovvie payments account to the app by tapping Payment Server → Link Payment Accounts.
- Tap Already have an account and sign in to Jovvie.
- After signing in, tap Connect to enable Payments on the Jovvie app.
- The app will ask for confirmation to Save API credentials. Tap OK.
- From the Payment Server settings, tap the Back button.
You’ve linked Payments to the Jovvie app. Now set up the Credit Card Gateway.
Set up the Credit Card Gateway
- Tap Credit Card Gateways under settings and Enable the Credit Card Gateway.
- Tap Add Credit Card Gateway.
- Select the Connection Type that applies to your payment device reader:
- Bluetooth: M2; WisePad 3
- Internet: Stripe Reader S700; WisePOS E
- Tap to Pay: NFC-enabled device
- Find the Stripe Location ID you set up previously in your WordPress admin under Forms → Settings → Jovvie Payments → Location & Terminals → Current Location.
- Select your payment device reader as the Device, and set the Stripe Location ID.
- Close the Credit Card Gateway Settings.
- Once closed, a permission screen will automatically appear in the app. Accept the permissions to connect to the reader.
Once credit card setup is successfully completed, a green dot will appear on the credit card icon. Setup is complete, and you can now accept in-person payments with the Jovvie app.
Start accepting in-person payments with the Jovvie app
- Select the Home button to load the page containing your form.
- Fill out the form and select Submit.
- On the Jovvie payment page, tap the Jovvie app option and tap Process Payment.
- A prompt to Swipe, Insert, or Tap the credit card on the payment device will appear.
- After the payment is processed, the Gravity Forms confirmation page is displayed, completing the submission.
- The form automatically refreshes within 5 seconds, ready for the next payment.
Kiosk and Counter-Service Options
Kiosk auto-reload
For a device taking repeated in-person submissions, leave Confirmation → Auto-reload enabled (it is on by default). After showing the confirmation for 5 seconds, the page reloads to a fresh, blank form. The delay is adjustable under Reload delay (seconds).
Counter-service browsers
If a logged-out shared device — a kiosk or front-desk browser — needs access to your terminal readers on the payment page, enable Payment Connect → Connect this browser from that device. Saving redirects you once to authorize, and reader access then survives logging out of WordPress.
FAQ & Troubleshooting
Where do I see payments?
Each submission is a standard Gravity Forms entry. The payment status (Processing, Paid, Failed, Refunded), transaction ID, and payment notes are all on the entry.
A payment is stuck in “Processing.”
This usually means the customer paid but closed the browser before returning to your site. The plugin reconciles automatically — an hourly background check polls Jovvie for the authoritative status and completes (or fails) the entry.
How do I refund a payment?
Refund it in Jovvie (or Stripe). The refund — full or partial — is reflected back onto the Gravity Forms entry automatically via webhook. There is no refund button inside Gravity Forms.
I see “Jovvie Payments is not configured” on an entry.
The Public Key and Secret Key are missing. Complete Connect Jovvie Payments with Your Stripe Account.
I see a notice that no payment webhook has been received.
Confirm the webhook URL is registered in your Jovvie dashboard and that your site is reachable over HTTPS (not localhost or maintenance mode). This notice only appears when Diagnostics is enabled.
Does it support subscriptions or recurring payments?
Not currently — one-time payments only.
Which payment processors are supported?
Jovvie supports Stripe today, with additional processors planned. The in-person checkout experience and the Gravity Forms integration stay the same regardless of the underlying processor.
What hardware is supported?
Web terminals: Stripe Reader S700 and BBPOS WisePOS E. Jovvie App terminals: Stripe M2, BBPOS WisePad 3, and Tap to Pay on supported iPhone and Android devices.
Can I use Tap to Pay without hardware?
Yes. Tap to Pay works on supported NFC-enabled iOS and Android devices without a separate reader.
How do I get logs for support?
Enable the Diagnostics checkbox on Forms → Settings → Jovvie Payments, reproduce the issue, and collect the log from Gravity Forms’ standard logging at Forms → Settings → Logging. Secrets and card data are never written to logs.
You have successfully set up Jovvie Payments and connected your Stripe account. You are now ready to accept in-person payments through Gravity Forms. Should you need any help, our support team is available at jovvie.com/support.